Friday, February 19, 2016

An Interactive e-Library of Student Work Using Google Apps


This post describes a Google powered system to showcase digital student work. It allows a school to collect and display published student pieces for the whole community or for each class. The process is centralized, so students only have to submit once to publish in both places.


Awesome Table
This is an Awesome Table build. For step by step information on using Awesome Tables, you can reference one of my recent posts or use the official support site. In this workflow, submissions from the form directly feed the Awesome Table. The table is formatted by an HTML template stored on the “Template” page. The questions not used in the template (Teacher, Genre, and Topic) filter and sort the table. The HTML template requires three variables: a link to the published document, the document title, and a link to an image representing the document. The published document can be anything with a web address. I used Flipshack to publish our Google Docs and copied the shared URL from there. The image representing the document is less intuitive.


Batch Process PDF to JPGs
When my older students self-publish, they’ll screen capture the covers to make an image file.  I prepared eBooks for two grade levels (2nd and 3rd) and using a screen capture for each one would have been a laborious option. Instead, I used a tool named PDF to JPG to easily batch processed the book covers into JPG images. Once the images were ready I uploaded them to a Google Site so that they had a static web address.


Creating Multiple Tables for Different Classes


The main form response sheet is used for our library website, creating a sortable Awesome Table for all submitted work. When work is submitted, the student’s teacher question is used by the spreadsheet to organize student work into class pages via a query. The query is easily customized by anyone using the sheet, simply add your teacher’s names to the formRanger variables sheet. Then, click cell B1 of each class page to select the appropriate teacher for that page. Simply copy the class page to add classes. Don't forget to add these names to the teacher question in the form, I recommend using the formRanger addon it keep it updated ;).


Future Plans


As it's currently designed, this system is meant for teacher submissions. I can foresee using some kind of moderation, like the FormMule powered process used in the Book Review Site, to make student submission possible. I’m also impressed by the expanding cards on this Awesome Table demo. I would love students to use this feature to introduce their work. Like everything, this is an ongoing project and I’m excited to see what the next iteration looks like. Let me know if you have any questions in the comments.

Wednesday, February 17, 2016

How to Host Images on a Google Site for the Web

Images need a web address in order to be used in a system like Awesome Tables and this post explains one way to get it done. For our Online Book Review site, I used book covers that were hosted on Library Thing. But for builds that use your own images, like a student art gallery or an ebook shelf of student work, you need to host your own images. This is a niche post that I will reference when I write about making Awesome Tables sing with hosted images. If you are never going to use Awesome Tables or if you have a web server, well, you probably don’t need this post. Otherwise, read on!

Using a Google Site is an easy way to host files for free online. Google Sites in the wild have a 100MB limit, which translates into a lot of JPG files. Sites work a little differently Inside of an EDU domain. The whole domain is capped at a 10 GB quota.


I usually make one site to host my media files and create a page for each class or project. I share the site with the audience I need, whether it’s public, for the domain, or for a smaller group. Then, I add the jpg files with the “Add Files” attachment feature on the bottom of the page. This creates a weblink for each uploaded image. Right click on the JPG name and “Copy the link address,” but do not stop there!  This link won’t work for the public and you might not realize the problem. In an insidious twist - it will work for you, making you think everything is good, but others will see a broken image link.

To make the link valid, paste the URL where you need it to go (into a form or a piece of HTML for instance) and delete everything from the question mark, on. You will be left with a web link that can be used in an Awesome Table or any other HTML.


I hope this post comes in handy for you. If it does, let me know in the comments!

Monday, February 15, 2016

Turning Google Docs into eBooks with Flipsnack

Screenshot 2016-02-15 at 11.47.00 AM.png


Sue Luft, one of our ELA helping teachers, challenged me to find a way to improve the “ebookiness” of our Google Doc nonfiction books. I admit, Google docs are unsatisfying to read as an ebook. After some Saturday surfing, I stumbled upon Flipsnack.


Flipsnack’s edu version follows a freemium model and is easy to use.  I love the gratifying page flip and it presents a beautiful full screen view. Pages are represented as thumbnails at the bottom of the screen for easy navigation. The backgrounds are also configurable - I like the nice wood grain. All of our nonfiction books were saved into PDFs and processed with Flipsnack.


The edu version allows you to set up a classroom with student accounts. This isn’t a feature I’ve taken advantage of yet but I can see it being really useful with my older grades. I started with 2nd grade work so I publish the books for our digital library myself. However, I could see our 4th grade students doing this in the future.


When student self publish they will also be able to submit their books to our school’s digital work library themselves. This be more sustainable for me and will allow students to take advantage of Flipsnack’s hyperlink and button features - bringing hypertext into the ebook genre. This is something that I think is appropriate to introduce in 4th grade.

Next weekend I will blog about our ebook shelves and discuss how to make them. I’m excited by the publishing potential of the Docs, Flipsnack, and the digital book shelves combination. Students will be content producers to a real audience from start to finish. Let me know if you have any questions in the comments!

Tuesday, February 9, 2016

2nd Grade Nonfiction Books Using Google Docs

Screenshot 2016-02-09 at 11.51.19 AM.png

The 3rd grade nonfiction template that I blogged about earlier in the year went really well. Student books like about Pythons and Michael Jordan are evidence that the template provided valuable scaffolding and did not overwhelm student agency. The success of the third grade books inspired us to adapt a version for the second grade. Our second grade students are new to docs and their first research project (ever) is a bird unit.  The newness of both Docs and online research meant that the template had to be simpler and more guided. Teachers had a choice between two template formats: a comparison between two birds and a focused book on one bird.


Like the 3rd grade templates, the second grade file relies on Google Drawings for text features. Instead of having students choose the features that support the text, the second grade book has diagrams in place for simplicity. Other elements like the dedication and copyright page are also removed to streamline the book.


Screenshot 2016-02-09 at 11.52.27 AM.png


The books came out terrific. Students created hand drawn illustrations which were scanned in for use in the diagrams. Students had a field day using drawings to creatively design their books, I personally love the life cycle drawings. Although the second grade templates are more structured than the third grade, students were still able to make them their own. I guess that’s my litmus test for a template - whether or not students have room for ownership. Take a look at our galleries below. Leave a comment or question for our authors if the mood strikes you!


Saturday, February 6, 2016

Kickin' Library Databases with a Google Sheet


We have a number of database subscriptions and our students use them regularly for research and reference. They each have strengths, some are well suited for biographies for instace, while others excel at zoology. Age appropriateness also varies. While our librarian discusses these attributes with our students, they sometimes need a reminder. Why not create a sortable database for the databases?

Creating something like this is a perfect task for Romain Vialard’s Awesome Table - a very cool Google Gadget that I’ve written about before. Our meta database allows students to filter results by grade levels and goals.

This post is a “how to.” It’s long, but it works well. Our system has a few features that I do not describe in detail below because it would just be too long. We use a second Awesome Table as a dashboard to allow Kate Byrnes, our librarian, to edit submissions and turn entries on and off. Form Mule gives us the capability to edit submissions and email the submitter. I promise to  blog about these enhancements in the future.

What You Need Before You Start
  • A google form connected to a Google Spreadsheet. The form should ask for the information needed in your site. This is grouped into two categories: information that will be visible in the awesome table and information that will filter the awesome table. My form uses the following:

Question
Question Type
Subscription Title
Text
Subject Area
Checkbox
Grade Level
Checkbox
Useful For
Checkbox
Icon URL
Text
Description
Paragraph Text
Image URL
Text
Web Link
Text
Password
Multiple Choice (Y,N)
Available Platforms
Checkbox

  • A protected Google Doc with your database passwords. We share this document only within our school domain to control access to the passwords.

Design Your HTML Template


Set Up Your Awesome Table Template
Awesome tables can use an HTML template to render variables from form. This is an incredibly powerful feature that Romain Vialard kind of snuck into his tool. I learned about it from talking to James Peterson, he’s a smart and helpful guy - worthy of following!

AwesomeTables uses HTML to draw the cards for the interface. You can be creative with the HTML. If you aren’t comfortable with HTML, you can use a page in a Google Site to design your card with sample data. Once your composition looks right in sites, click on the “HTML” button in the menu bar. Copy the HTML from the window that appears. Then, return to your Google Sheet and add a page named “Template.” Paste your HTML into cell B1 of the template sheet. I have included my HTML further down the post.

The key to using the AwesomeTable template feature is identifying the variables in your HTML. These are the values that will change from entry to entry, such as the subscription title. Each place in the HTML where these variables are used should be changed to reflect the name of the corresponding column in the Google sheet (shown in red below.) Each variable needs to start with ${“ and end with “} (shown in green below.) The HTML used in my template is:

<table style="width:100%;background-color:#ffffff;border-radius:25px;padding:15px">
<tbody>
<tr>
<td>
<div><img border="0" src="${"Icon URL"}" style="display:inline;margin:5px 50px 10px 10px;background-color:transparent;width:30%">
<h2><a href="
${"Web Link"}
" target="_blank">
${"Subscription Title"}
</a></h2>
<hr>
<div style="line-height:1.5">${"Description"}
<div><br>
<div style="line-height:1.5">
<div>
${"Password Condition"}
</span></div>
</div>
</div>
</div>
</div>
</td>
</tr>
</tbody>
</table>

Creating the Awesome Table
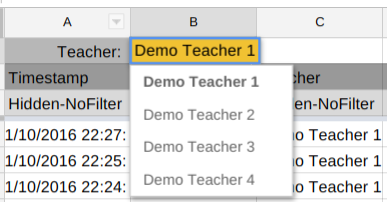
The Awesome table is fed through the form, but the gadget needs row two of the the Google sheet to contain instructions. Drag the freeze frame line under row two, locking the first and second row. In this second row, add instructions for how Awesome Table will filter and show the data from that column. You can learn more about Awesome Table filters here. My system uses the filters shown below. Notice that they all say “Hidden.” This is because the visible bits are being handled by the template. The items that are being used in the template say “nofilter.” These are not showing as a filter on the top of the table because they are expressly used for rendering the database cards. Ultimately, the sheet looks something like this.


Question
Question Type
Purpose
Filter
Subscription Title
Text
Builds cards
nofilter - Hidden
Subject Area
Checkbox
Filters table
csvFilter - Hidden
Grade Level
Checkbox
Filters table
csvFilter - Hidden
Useful For
Checkbox
Filters table
csvFilter - Hidden
Icon URL
Text
Builds cards
nofilter - Hidden
Description
Paragraph Text
Builds cards
nofilter - Hidden
Image URL
Text
Builds cards
nofilter - Hidden
Web Link
Text
Builds cards
nofilter - Hidden
Password
Multiple Choice (Y,N)
Builds cards
nofilter - Hidden
Available Platforms
Checkbox
Filters table
csvFilter - Hidden

Making the Password Link Conditional
Some of the items in our database are subscription based, like World Book, and need a password to access. Other sites are free, like DK Find Out, but are certainly worthy of representation! We are managing our passwords with a protected Google Doc and wanted a way to show the link to the doc when a password is required but read “No password required” when the site was free. This is done with an “If, then” statement.

Title the column on the left of your Form Response sheet “Password Condition.” In row two, set this column to “nofilter - Hidden.” This “If, Then” statement is going to reference the “Password” Yes or No question. If no password is need, it will say simply that.  If a password is required, HTML for the password link will be used. I add this HTML to the Template page, in cell B11. Again, use that Google Sites trick  if you aren’t big on HTML

In row 3, add the function below. This is a nested “If, Then” statement. If this function could talk, this is what it would say, “Okay, I’m an array, so I will apply to whole column (ARRAYFORMULA.) I’m going to look at the timestamp column (A3:A) to tell me whether or not I should work. If there is something there, I’m going to look at the Password column (J3:J.) If this says "No", then I guess I’ll write "No password needed.” But, it might say "Yes," in which case I’ll use the stuff in cell B11 of the Template page.”

=ARRAYFORMULA( IF( A3:A = "",, IF( J3:J="No", "No password needed", IF( J3:J="Yes", Template!B11,))))

Pulling it All Together
Now the sheet is ready to connect to the Awesome Table gadget.
  1. Start by editing a Google Site page and inserting a Gadget. Use the “Featured” gadget library to find Awesome Tables.
  2. Once added, open the gadget’s preferences window and log into Awesome Tables with your Google Account. Click the “New” button.
  3. Then, paste in your sheet URL, the sheet name, and the complete cell range for your data. Remember to share the sheet to the same audience as your table. If the table is meant to public, the sheet also must be public.
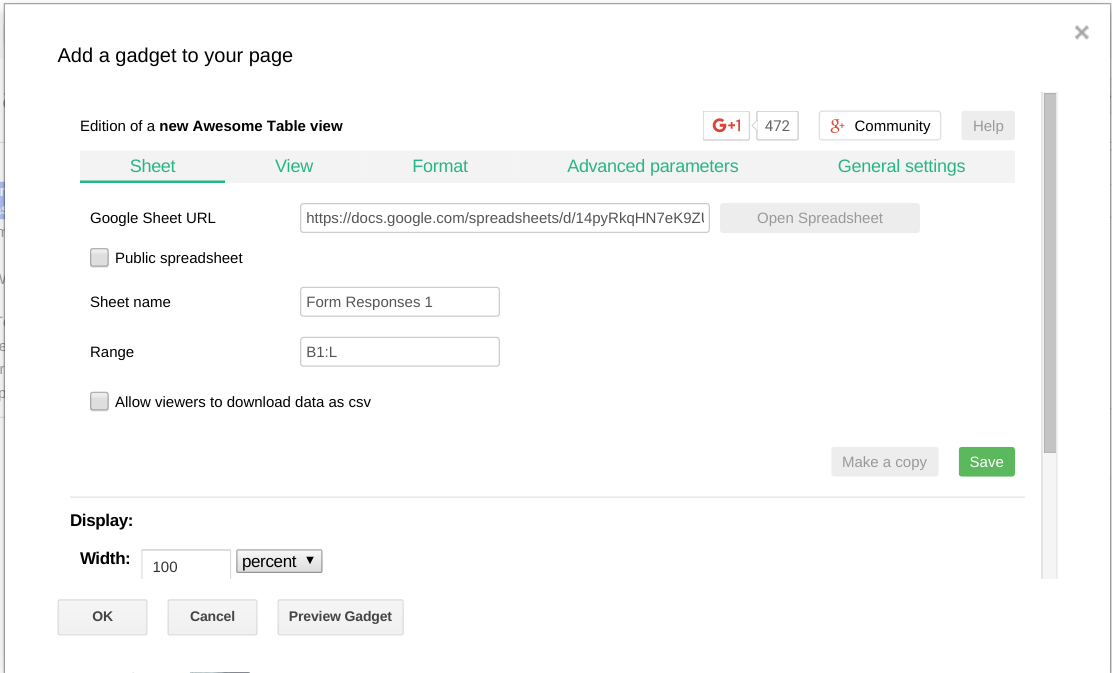
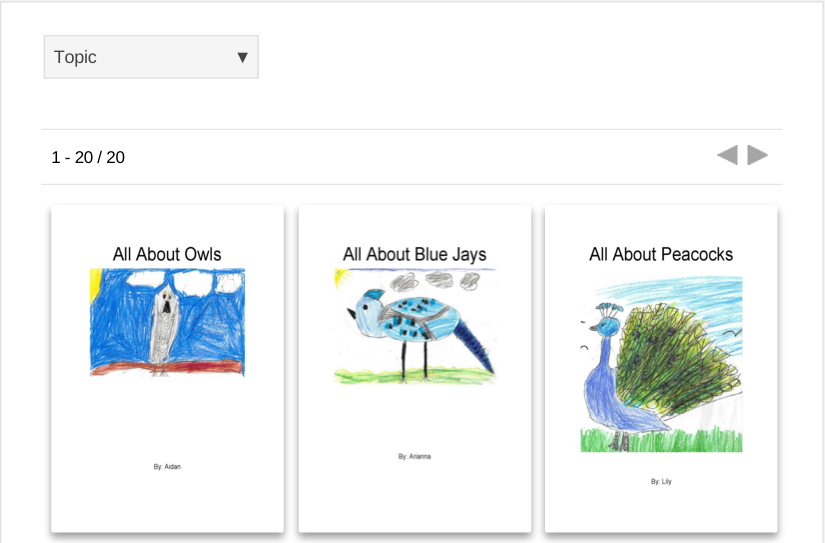
  4. Next, click the “View” menu and change the default view from “Table” to “Cards.” The variables in this menu require some trial and error. You can play with how many cards are in a row and wide each card is, but first, click the “General Settings” tab and name your table. I like three cards across.
  5. Now, click the “Advanced Parameters” tab to connect the HTML template. In the box labeled “Template Range” add the sheet name and the box cell of the HTML code separated by an exclamation point. In my demo file this is “Template!B7.”
  6. Set your gadget display height on the bottom of the preferences window. I usually use 2000.
  7. Finally, and this is important, click the green “Save” button. Then click “OK” and save your Google Site page to see how it looks. Edit the page again to adjust the settings.

Congratulations for getting this far! I use Awesome Tables all the time and you will too when you unlock how they work. The great thing about something like this is that you can reuse the bones of the system. My next step with this system is to convert it into a Student Bookmarks tool and I’ll let you know how it goes. If you use this post, or if you have any questions, let me know in comments.