Monday, December 16, 2013

The Google Site FounderBook

My fifth grade classes are studying the Founders and the Constitutional Convention.  There are lots of fun ways to redefine the traditional essay project with this rich subject matter. I really appreciate the work that many have done using social media parodies, like these examples of Historical Fakebook projects.  I wanted to leverage these ideas, too, but using Google Apps - Sites in particular.  

I wanted to build a Google Site that capitalized on the efforts of the class by building social interaction into the project.  What's the point of building a FounderBook page if the founder can't interact with his contemporaries?  

So, this is my first attempt.  It's a good start, but I'm sure I've missed an opportunity or two. This template allows students to build a profile for a Founder, blog from his perspective, and perhaps leave comments on the pages of the other founders. Announcement pages and page templates make Sites well suited for this task.  I built two convention pages to accommodate a class of twenty-plus students.  There is a founder template page ready if you need to add personalities to the list.  The respective convention home pages feature announcement gadgets to display the running blogs for each founder.  

If you're interested in using the template with your class, simply follow the directions below:

1. Create your site by clicking “Use this Template” on the top of the template linked here: https://sites.google.com/site/usfounderbook/


2. Edit the Homepage of your FounderBook by clicking the pencil icon on the top right.


3. Assign Founders to the students in your class by replacing the placeholder names in “Convention 1” and “Convention 2”


4. Click the blue “Share” button and give the students in your class edit access to the site. 


5. This site will now appear on the Students' Sites pages, located at http://sites.google.com. You can also copy and paste the site address into a Google Doc that is shared with your class.

6. The "Instructions Page" assumes that your class has already done research on their Founders and gives a step by step guide to complete the project.

I have several classes using the template and it's going well so far.  Let me know if you improve on the template and/or try it out!

Sunday, December 1, 2013

Google Site Sharing Repository, Part 2: Creating HTML to link formFolio to Google Sites


It’s taken me a few weeks, but I’ve finally finished the Google Site Sharing repository.  Well, finished might be going too far - I’m in “trusted tester” mode.  This is basically how it works: using a Google form outfitted with +Andrew Stillman's formFolio, a teacher in our district’s domain can submit a resource and organize it with keywords. The Google Spreadsheet uses the information from the form to create a Sites page via the createWebPage method. Next, the pushData script exports the catalog information to a public sheet that informs +Romain Vialard's aptly named “Awesome Table” gadget.  This becomes the front end of the repository.

The Google form is one of the largest I have made with 160 items, most of which are conditional. Teachers are able to select grade levels and subject areas to organize what they are sharing. The formRanger method I described earlier is working really well. Even though I started with a baseline list of keywords, it was immediately evident that keywords could not be static.  I've added new keywords with each test submission. After the system is used for a while, I’ll be able to prune keywords from my original baseline that aren't being used. You can see a copy of the form here without the sign in restrictions so that you can see how it flows.

The spreadsheet builds the HTML for the Google Site using the variables from the form submission. The HTML is then used by the "createWebPages" script method to create the Google Site page. To do this, create two spreadsheet pages in addition to the the Form Submission page. Name one page "HTML" and the other "Page Builder."

Next, construct your new page template in Google Sites, manually using the variables you intend to feed from the form. Use a simple page format - not one with sections or columns. When the page looks right, click the HTML button in the toolbar and copy the code. Return to the Google spreadsheet and paste the code into the "HTML" page.  Scan the HTML for the variables that will be populated by the form submissions and cut the code around each variable, pasting it into sequential cells like this.  Leave out the variables, these will be populated from the form using a spreadsheet function.

Now combine the form submissions with the HTML on the "Page Builder" page using an ARRAYFORMULA. You can get creative with how to do this, such as using IF/THAN and VLOOKUP functions to customize the HTML based on the form submissions. Make sure you use the "Resource URL" column created by the formFolio script to connect the submission to the Google Site. In the demo example, you'll find a simple concatenate function:  

=ARRAYFORMULA ( HTML!$B$4 & 'Form Responses'!A2:A & HTML!$B$5 & 'Form Responses'!D2:D & HTML!$B$6 & 'Form Responses'!J2:J & HTML!$B$7 & 'Form Responses'!C2:C & HTML!$B$8 )

Once you have your HTML code you can invoke the createWebPages method. A decent guide for using this method can be found in +James Ferreira's book, Google Script: Enterprise Application Essentials.  Just a warning: this book was out of date just months after it was released - Google Apps Script evolves too often for print.  That said, the ideas found in the book are still relevant and useful.

What Didn't Work


I wanted to include a Google folder gadget on each page so that viewers could see what was shared. I was able to create code that worked using the method above, as long as it was pasted into a page. Unfortunately, createWebPages seems to have stricter rules for code. No matter what I tried, the script would strip the Google gadget out of the HTML. In the long run, I don't think it's necessary. I actually prefer the plus one gadget.

What Might be Next


I'd like to investigate +Martin Hawksey's post "Using Google Spreadsheets as a Google Analytics Data Bridge".  I think it'd be cool to use analytics to show users what's popular on the site. For the time being, though, the priority is showing teachers the site and providing professional development on how to use it.


Sunday, November 10, 2013

Google Site Sharing Repository, Part 1: a Tagging System with formRanger


This is the first post about creating a Google Site file sharing repository.  The site will be populated automatically via a Google form, and powered by a few +Andrew Stillman  scripts (for background, look at this post here.)  This post will explain the tagging system, and how a combination of Google Spreadsheets, some functions, and formRanger will make the tags teacher generated and dynamic.  

Tags will create the organizational structure of the file repository. Teacher ownership over the tags is a crucial part of this.  It is impossible for a small group to derive the best categories for all the teachers across multiple buildings and grade levels. Furthermore, categories change over time and the site needs to be dynamic to stay relevant. The Google form that we are using to submit resources will employ "checkbox" question types for teachers to select multiple keywords. These will be organized by grade level and subject. Each checkbox will also include an "Other" option for teachers to contribute their own comma separated keywords.  The contributions added in the "Other" box will be taken by Andrew's formRanger script to update the form, creating a feedback loop. Users of the site will be able to see how many times each keyword has been used and will be able to click on Keywords to see similar resources.

In order for this to happen, the spreadsheet needs to do several things: 
  1. separate the comma separated keywords
  2. identify the unique keywords
  3. add the unique keywords to a list that informs formRanger
  4. and count the number of times each keyword is used. 
To do this, the spreadsheet needs three pages:
  1. one for the form responses (created via the form.) (Form Responses 1)
  2. one to separate the comma delimited values (csv horz. array)
  3. one to collect the unique keywords into a column and count how many are used. (formRanger List)
First, create a form and use a check box question type for the tags.  Add all the categories that you'd like to start with to the check box. Use the form you just made and check off each category, then submit.  This step is important because formRanger will replace the categories with those from the spreadsheet. Filling out the form gives formRanger a baseline.


Next, create a sheet for formRanger. This sheet will use the form submissions to check for unique items (from the "other" field,) split the responses by comma, and sort alphabetically. Add this function to A2 of the "formRanger List" sheet:
=sort(unique(transpose(split(ArrayFormula(concatenate('Form Responses 1'!B2:B&",")),","))))
Then, install formRanger and use the column created on the formRanger List sheet to populate your checkbox. Set formRanger to run with every form submission.

At this point, you have a loop where the tag question from the form is updated automatically. Now, lets set up a counting system so users know how many times each tag has been used.  To do this we need to break up the CSV responses so that each tag has it's own cell. Create a third sheet to delineate the comma separated values from the checkbox responses. Use this function in A2:
=ArrayFormula(iferror(if({1,0},'Form Responses 1'!B3:B;split('Form Responses 1'!B3:B;","))))
Notice that the array starts on B3, this is because you don't want to count your first submission where you checked everything. Finally, count the instances of delineated values in the new sheet using this function in B2 of the formRanger list sheet:
=ArrayFormula(if(len(A2:A),countif('csv horz. array'!B2:BZ,A2:A),iferror(1/0)))
So, there you have it! The "formRanger" list can be used in a number of different ways.  I'll be converting these into links that search the website.

There is one thing that doesn't work the way I intended.  The "sort" function on the formRanger List page doesn't alphabetize the first and last entries.  I have no idea why - let me know if you do!

Saturday, November 9, 2013

Building a teacher sharing reposititory in Google Sites using scripts


My district uses Google Apps for Education, which is an amazing platform to support teacher communities of practice.  That said, creating a culture of collaboration is hard - there are all sorts of things that get in the way. Teachers often question whether what they have is worth sharing, they are concerned that their work will be judged by peers, but most of all, they don't have time.  To help build the culture in my district, we are promoting a mixture of Google Plus and physical "meetups" to encourage teachers to share practice. But while Google Plus is great for conversations, it's less useful to share "stuff." 

We thought Google Drive might help so we organized folders by subject and grade level.  It was important to us to make the process democratic and we gave the whole faculty edit access to the folders. Unfortunately, this had unintended consequences. Teachers accidentally edited the work of others without making copies. Folks who installed the local Google drive accidentally deleted work that they didn't need - not realizing it deleted the work for everyone.  This didn't help win over the cause of sharing.

When Andrew Stillman released the formFolio script I realized that there might be an alternative.  Using a combination of formFolio, formMule, formRanger, and some custom script, I am creating a Google Site that will do the following:
  1. Create Google Sites pages automatically on teacher form submission.
  2. Add the teacher's resource to a neutral folder where people can access but not edit.
  3. The form will create a page that contains a link to the resource, a description, attribution, and custom tags created by the user that link to similar resources.
  4. User created tags that will, in turn, re-populate the form to keep it relevant.
  5. The Google site will include analytics to point teachers to the most popular submissions.
  6. User will be able to promote useful resources via Google Plus.
  7. When teachers submit a resource, they will also receive a thank you email with a link to their resource page and a link to suggestions of similar resources.
The pages created by the Google form will create pages similar to this mock-up. Ultimately, we need the system to be easy to use.  My teachers are already using Apps and I hope to reduce cognitive load by using tools that already familiar. Furthermore, building the site in Google keeps the system free and consistent.  That's the plan, anyway! 

I will document the journey here in parts.  My first post will describe the custom tagging system.  I know it can be done, whether the system will be successful remains to be seen. I'm going on the "If you build it..." theory.  

Friday, October 25, 2013

Keyboarding: It isn’t sexy, but neither is eating.


We kicked off keyboarding this week with our third graders.  Keyboarding will be king until the way we input information into computers shifts.  And while speech recognition is getting pretty awesome - it still doesn’t work in a crowded room.  The skill is really important - especially as I watch my 5th grade students peck inefficiently on their new Chromebooks. We can do better. 


So this is our plan: Every third grade student cycles through the lab every day for twenty minutes during a two week immersion period.  We’ve purchased a school subscription to Typing Club, a web based typing app.  It is free for individuals, but we needed the centralized management of the school edition.  I’m happy to report that the pay version is a more robust than the free beta was last year. Typing Club can use Google Apps as a passkey which is also really convenient for us. We’ve pushed the Typing Club Chrome App to our students’ Chrome browsers.  They have to configure the Chrome App (command+click on the App, go to “options,” and then point to our Typing Club domain) but that is easy enough.

During the first week, students practice typing position and the home row. During the second week, I tape a thick piece of paper to the keyboard and require the kids to cover their hands with the paper.  The paper has a keyboard printed on it for reference if they have to look down. After week two, the immersion period is over and we move into homework mode.  Each student must use typing club at home twice a week for fifteen minutes.  It’s easy for teachers to hold students accountable via the Typing Club report feature.  We also send this letter home, which helps communicate the "what and why" of the plan.   We are just entering week two.  The kids have gotten into using Typing Club, they like competing against their own scores.  The program is straightforward and doesn't have the glitz of some of the competition.  I actually like the clean interface and I think it keeps kids focused on what they need to do.  A game or two would be a nice reward, though, and this is missing. Hopefully they will add some moving forward.  Bottom line: the programs works well, it’s simple to set up, and it’s easy for kids for use. I'll let you know how it goes.


Friday, October 4, 2013

Online Rights and Responsibilities with formRanger


The highlight of this week was a 5th grade lesson on digital citizenship.  Students had previously created a chart of classroom rights and responsibilities and discussed the differences between them.  In my lab, we set out to create another list of digital rights and responsibilities. This is a particularly relevant task considering our upcoming 1 to 1 chromebook initiative. The lesson had three elements that worked: using the right right videos, having students create a list collaboratively in a Google spreadsheet, and then vote on their favorites using a formRanger updated form.
It’s hard finding videos on digital citizenship for 10 year-olds because most of the content is targeted for older or younger students. After much searching I found two that fit perfectly.  The first video is a short piece on digital footprints and was a perfect anticipatory set to start our discussion. After talking about digital footprints and why they are important, students started collaboratively building a list of what they felt should be their online rights and responsibilities. I get a thrill each time I see a class working on the same spreadsheet at the same time.  It is amazing to watch them self organize.
After a few moments, we brought the class back together to watch another great spot by Common Sense Media on Cyber Bullying. We checked for duplicates as a team and the student written Rights and Responsibilities were used to update a Google Form via the formRanger script.   Before the period ended, students had used the form to vote on their new digital rights and responsibilities list.  

The Google spreadsheet and form allowed the kids to be at the center of the process.  In the past we would use chart paper and solicit discussion.  Some students would contribute, others would watch.  This lesson was different - everyone was involved - everyone contributed to the list in some way.  That universal contribution lead to more engaged discussion and a pretty great list.  See for yourself.

Tuesday, October 1, 2013

Observation Form with Autocrat and FormRanger


It's almost as if the Google Scripts Autocrat and FormMule were made with the teacher observation process in mind.  Although the good folks at YouPD shared an excellent example of a teacher observation system using FormMule, there were a few things that didn’t quite fit my school. Thankfully, I was able to study their Teacher Mini-Observation Tracking System and lift some really good ideas.  In the end there were several things that I needed to behave differently:
  • The formMule script triggers it’s merge on form submit and I need my administrators to have less pressure. They might start the observation in the classroom, but come back to it later to flesh out comments. To do this I shaped the system around the Autocrat script because the trigger for the merge can be based on a value in the spreadsheet. As a result, the administrator can start the form and submit it unfinished, then come back to the form later via a bookmark.
  • The YouPD Mini-Ob tracker is provides a beautiful structure for great feedback.  I needed the form to be a little easier to submit via a tablet. My form relies on multiple choice questions organized and informed by by Danielson's four domains. Each domain includes a comments/evidence section, for more personalized feedback.  Administrators can bang out notes here, and pull it all together later after bookmarking the incomplete form.
  • My teachers will be observed three times this year - one formal and two informal. This system is meant for the two informal observations.  If two observations have occurred, the teacher’s name is removed from the form using formRanger.  


That's it. Most of the magic happens in the autocrat script. The "log" page concatenates each domain's feedback and adds the personalized comments. I think the doc looks pretty good when it's merged. I’ve left some comments on the spreadsheet to help navigate how to make it yours.  I hope it’s useful!


Sunday, September 22, 2013

Improved Scheduler


This system has been updated here

So, I’ve been tinkering with the 6-day schedule spreadsheet I blogged about last week, and I cleaned up a bunch of the issues that I mentioned in that post.  Most notably, I reworked the sheet to allow for asynchronous schedules (thanks to feedback from Christine Hartooni.)  Now you can create a signup sheet that has a different schedule on each day of the six day cycle, if needed.  I also cleaned up some of the sheet mechanics.  Each month's sheet is now populated by a query and doesn’t need any manual adjustment (that will be great next year.)  The period schedule is populated via a VLOOKUP and no longer needs an ARRAYFORMULA. BAsically, it's just cleaner all around.


Here is a link to the new and improved scheduler.


Set Up:

To use the sheet, simply fill out the faculty list page with your own users and emails.  Then, set up your own 6 day cycle and add the HTML link to your calendar on the “6 Day Cycle” sheet. Next, customize the period start and end dates on the “Teacher Schedule” page. Finally, you want to set up Form Mule.  You can copy and paste my workflow into the script , or you can set up your own. Either way, you’ll want to set a location for the calendar and paste in your calendar ID into step 2b of FormMule.


Create a Teacher’s Schedule for the Year

I had mentioned that I would probably wait until next September to make these fixes, and then I discovered that my design was too limiting and prevented me from using it, too!  Sorry about that.  These changes allowed me to make another sheet that doesn’t use sign ups at all, instead it will plot a teacher’s schedule for the year across a 6 day cycle.  Basically, this modification uses VLOOKUP to populate entirety of each month sheet from the “Teacher Schedule” sheet.  Worked great.


Here is a link to the Teacher Schedule sheet.


Iteration is so important.  I feel like our students don’t get the time to iterate thanks to overpacked curriculums.  But that is a post for another day, isn’t it?

Saturday, September 14, 2013

Creating a Sign Up system with FormMule and Google Spreadsheets


I think we are beginning to leave the era of the computer lab. The specter of the common core tests have done at least one good thing: motivate a progression towards one to one computing in schools.  That said, schedules and sign ups are still the arteries that make schools tick. The lab and cart schedule are no exception. Google calendars helped to update the conventional sign up sheet, but there are parts that just don’t fit school culture. Google Calendars don’t support 6 day cycles (many schools, including mine, are reliant on this awkward format) and a calendar without time slots is too easy for teachers to abuse (you know who you are.) Last year I tried appointment slots, which work well from some schools, but I found it complicated for my teachers to change or delete events. It turns out that my teachers change events a lot.  


Thankfully, Google Scripts provided a solution this summer. PushData and FormMule have allowed me to customize a system that will “just work,” and best of all, I don’t have to think it about it (much) once it’s set up.  I have four schedules for various lab carts and rooms and the PushData script migrates the schedule, the six day cycle, and my faculty list to each.  When a snow day changes the 6-day cycle, all I have to do is make one change on the master 6-day cycle sheet and all the schedules update.  Once on the schedule, various functions move the data around to automatically populate and organize a vertical agenda for each month.  Teachers can select their name from a validated drop down list, add a description to their event, paste in a relevant Google Doc URL and invite a guest.  Thanks to FormMule, the schedule automatically adds the event to a Google Calendar and sends reminder emails to participants.  If a teacher needs to modify or delete an event, they just record the change and make a note in the “Update/Delete” column, then POOF the calendar is fixed.


It took me a little while to figure out how to configure the Spreadsheet to behave correctly.  I wanted to share it here just in case it's useful for someone else.  All of the settings will copy with the spreadsheet - you'll just have to add a calendar ID.  A really big thank you goes out to Andrew Stillman whose awesome scripts made the whole thing possible.


Click here to open the Demo Schedule sheet.  Read on for setup notes and other things.


What you need to do to set this up:

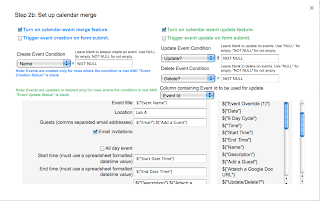
    Settings for FormMule step 2b

  • Copy the sheet.
  • Create a Calendar to sync
  • Copy the calendar ID
  • Run the FormMule Script.
  • Configure the FormMule Script (See the screen capture for step 2b above.)
  • Paste calendar ID into the appropriate spot of the FormMule settings window.
  • Add your own faculty to the Faculty sheet.  I push this out with Pushdata so that changes are easily maintained.
  • Set up your triggers: - I added a one hour trigger to the manualSend handler because I am not using a form submission and I want teacher to be able to see the schedule when they sign up - I added a clearRange handler that will reset the “update/delete” column on each month’s sheet.  This will reset the edit condition for multiple revisions. I set a daily trigger that fires every morning at 2AM.
  • Populate the “Faculty List” sheet with your teachers and their google account emails. I used PushData for this because I have several schedules and don’t want to keep track of multiple edits.
  • Edit the six day cycle sheet to reflect your calendar.  I use PushData for this, too.
  • Edit the time slot sheet (Yup. PushData.)
  • I have named ranges for all the rows and columns with formulas, you may want to protect these if you use it in your school, just in case a teacher accidentally changes something.
  • Hide all the sheets that aren't labeled for a month.

What I want to make better:
I just don’t have time to fix all the things that work, but could work better.  The time slots are currently rendered to the month sheets using the ARRAYFORMULA function.  This works, but it is inelegant. I did this because I needed to account to holidays and the daily repeat of the schedule, doing it manually was the easiest path.  In the next iteration I want this to account for holidays and the daily schedules automatically.


I also push the dates to each month using ARRAYFORMULA (This is in hidden rows at the top of each sheet.  I used the formula to quickly develop the rest of the sheet and now I don’t really have the time to go back and fix it.  I’d rather something like VLOOKUP here.


The next time I work on this (probably next September) I will address these issues.  If you get to it before then, let me know! As far that goes, let me know if you see a better way to do anything else!

Something I learned:

Go easy on time based triggers. I added two triggers to Andrew’s FormMule.  I wanted changes to schedule to be quickly reported on the calendar so I made the trigger fire every 5 minutes. This created an error after I used up my allocated CPU time.  I have since changed my triggers to fire every hour and it works much better.

Tuesday, January 1, 2013

Minecraft Possibilities Part 3


It’s always about choices, isn’t it?  Choices are wonderful and dangerous.  They complicate things, and for a Minecraft newbie like myself, they introduce risk.  The first big choice involved with using Minecraft in instruction is choosing a server platform.  The vanilla server (from the Minecraft folks) was never an option; it just isn’t extensible enough to create an usable place for students.  From what I have seen, the options boil down to CraftBukkit, a Minecraft server with an enthusiastic community of developer support, and MinecraftEdu, a server fork developed specifically for education.  This particular choice reminds me of the difference between using a service like Edublogs and installing your own Wordpress server.  With your own server you can do anything, but you can also break your installation and make things really complicated.  Edublogs can be restrictive, but the learning curve is shorter and the knowledge that things will “just work” is comforting and important.  
I decided to install the Bukkit Server for my home LAN because it was free and I was impressed by the available plug in options.  There are actually too many, and this is further complicated by differences in plugin quality and version compatibility.  I used a combination of “Top Plugin” lists to sort through the choices and come up with four that would meet my goals:


  • Multiverse - This plugin allows a server to host multiple worlds.  I envision a “creative” server where students can build without worrying about things like hunger and monsters.  That said, these are the aspects that make “survival” servers so much fun.  A simulated community would want to be built on a survival server, I think, and multiverse allows both of these things to happen.
  • Minecraft Essentials - Essentials provides too much to list.  The command list provides an opportunity to control the in-game environment and moderate the players.  It also creates a permissioning system which would be necessary to create levels of users, perhaps introducing an opportunity to involve students across the grades.
  • World Edit - This is a super powerful plugin to modify the landscape and build structures.  It has a hefty learning curve, but introduces some opportunities to teach geometry.  As always, YouTube was quite helpful (I found it interesting, though not surprising, that most Minecraft "How-To" videos are produced by kids.)  
  • Towny - This plugin creates a simulated community environment.  Towny does heaps of useful things, including granting students a plot on which they can build and providing a foundation for government.  There are mechanisms for economy, elections, taxes, towns and city states.
While installing the server and plugins weren’t too difficult, using the system as an admin takes some work.  I think I’ll wind up printing out the dozens of commands which work from the command line within the game.  This complexity does add a barrier and makes me realize why the Minecraft Edu server exits.
Minecraft Edu includes nice in game interfaces and many special features for classroom use.  I think some of the features, like the special blocks, can be reproduced with Bukkit mods but Minecraft Edu is so much simpler to use.  While I haven’t played with it yet, it appears as though the admin functions all have an interface, no command line needed.  For that alone I think the Edu server is worth exploring.  There are trade-offs. The plugins that work with Bukkit will not work with Minecraft Edu and the opportunity to create rich and immersive digital environments provided by plugins like Towny are lost.  
As a teacher, I think the simplicity of Minecraft Edu for instruction is important.  But to get everything I want would require setting up two servers and I’m not sure I can pull that off.  I am leaning towards starting with a Bukkit server because I am most likely piloting the game in a school club.  I won’t necessarily need the structure of the Edu server and I would want to have conversations about the community with club members, then build the world accordingly.  I think the flexibility of Bukkit server would lend itself better to these needs.   I should disclose that I also have experience with installing two Wordpress servers.  Both of which are broken (in fairness, my last blog was taken down by Russian hackers) and I now find myself writing a third blog using Blogger.  Hmmm.