Showing posts with label Portfolios. Show all posts

Sunday, November 12, 2017

Well Played, Vermont

“Messy, Hectic, and Exciting…”

I couldn’t imagine a better way to describe the essential experience of learning. It was more than enough to catch my eye as I scanned EdWeek this weekend. In a piece titled “Messy, Hectic, and Exciting: A Very Ambitious Statewide Personalized Learning Experiment,” author Kevin Bushweller describes how schools are implementing and interpreting Vermont’s new law, Act 77, also known as Flexible Pathways. The article optimistically provides an alternative narrative to the test driven culture that has infected K-12 education.
Act 77 requires all students to create a “Personal Learning Plan” (PLP) that communicates student strengths, weaknesses, and goals, while providing children with an opportunity to reflect on their learning and their future. It’s a heady charge but it sounds like the type of worthwhile examination that should be engaged by every secondary student. I'm trying to wrap my head around this plan and have many questions: What standards are being used? What does a PLP look like? How much change happens from year to year? How much time goes into a student’s pursuit of their Personal Learning Plan?
Vermont’s Agency of Education has created a checklist to outline the minimum requirements for a PLP. The list is extensive and includes a good dose of introspection. Questions like “What do you stand for?” and the inclusion of a learning styles inventory demonstrates a meta-analysis that I have not seen since the Ted Sizer Essential School’s Movement. Also noted were concrete action steps that require goals, timelines, and the verification of achievement. This template provides a basic format for a PLP, although it seems that each school is approaching PLPs in a different way.
Bushweller describes a student from Champlain Valley Union High School who conducted a 30 minute presentation of her PLP to a panel of teachers and other adults. Initially dismissive, the teen found the process, and the feedback she received, empowering and valuable. This seems to be a more purposeful format than filling out an online form. However worthwhile, I can’t help but wonder about the scheduling realities of accommodating this level of 7-12 presentation!
This is an exciting initiative to watch grow.  In many ways, Flexible Pathways reminds me of the 5th grade capstone project that we do in Scarsdale. Unlike our capstone, the student PLPs will grow and evolve from year to year. The focus on learner strengths, growth, and goals is powerful and connecting these elements to personal passions is a distinguishing feature of the program. I am impressed and plan on delving into the Flexible Pathways Google Site, which hosts a myriad of resources and webinars, to learn more.
My hat is off to you, Vermont. I can't wait to see where you go with this and hope New York and follow your lead!


Tuesday, June 2, 2015

A Google Slides Student Museum


Back in March I had the good fortune of sitting in on +Caren Macconnell’s Google Summit workshop on Choose Your Own Adventure Using Google. Caren did a great job and really got my wheels turning - you can do a lot with this kind of interactivity and it shines in the classroom.


In the past I've used a wiki to create interactive stories like this. It worked pretty well but graphics were more complicated than they needed to be and students couldn’t work on the same page at the same time. Google Slides is a much more flexible and user-friendly tool.

Creating non-linear links or buttons in a Slides presentation is a snap. Just select the text or shape that you want to link to another slide, click the link button, then select the destination slide. This process is even easier if you title the slides beforehand.

This came in handy recently after a local artist visited one of our second grade classrooms. Caren shared a museum template during her Summit workshop that becomes a great showcase for student work and reflections. This was the inspiration for the Museum at QR Slide deck embedded in this post.


Like Google Drawing, slides is an under appreciated tool. I think Slides is sometimes mistaken as limited because it’s easy to use. Don’t fall for this trap, nothing is further from the truth.

Saturday, October 4, 2014

Student Timelines from a Google Form using sheetSpider

An update for this project has been posted here.

The goal of this project is to give students a personal timeline of the wonderings and observations that they make using a Google Form. Then, this slick timeline can be embedded in a student portfolio. This project can be integrated into the moderated Twitter exit ticket that I blogged about a few weeks ago, or it can stand alone.


Here is what you need:
  • A simple Google Form linked to an “old” spreadsheet that required students to sign into your domain.
  • The SheetSpider Script from New Visions for Public Schools (thus the “old” spreadsheet)
  • An affinity for nice looking timelines


I can’t wait to implement this in my school, and hopefully build it into some student portfolios. One word of caution: this system needs the student satellite sheet to be published to the web in order for it to be read by the Timeline application. The next section explains how to do this yourself, step by step. There currently isn’t a moderation component although one could be built in, similar to the one used for the Twitter system.

So How Does This Work?
SheetSpider is a nifty script that lets you distribute values to multiple sheets based on a criteria - in this case the criteria is the student Google ID.  Based on this ID, sheetSpider will send each student’s exit ticket responses to a unique Sheet for that student. SheetSpider can be set to use a template when making the satellite sheets and we will use the template file from Timeline JS. If you haven’t seen this Timeline creator, you should.  It does a beautiful job.


Make a copy of the Timeline template and then use the “copy to” feature to add the sheet to your “Exit Ticket” sheet file. The timeline sheet has more columns than we need for our simple exit ticket form, but we need the whole template when we copy the student submissions to the satellite sheets. Specifically, we want to send the form response timestamp to the “Start Date” column, the exit tweet column to the “Headline” column, and the username column to "Media Credit." A simple function like the one below can move the data from tab to tab, you'll see it at the top of the previously mentioned columns in the demo sheet.


= ARRAYFORMULA ( If ( 'Form Responses 1'!C2:C = "", "", 'Form Responses 1'!C2:C ) )


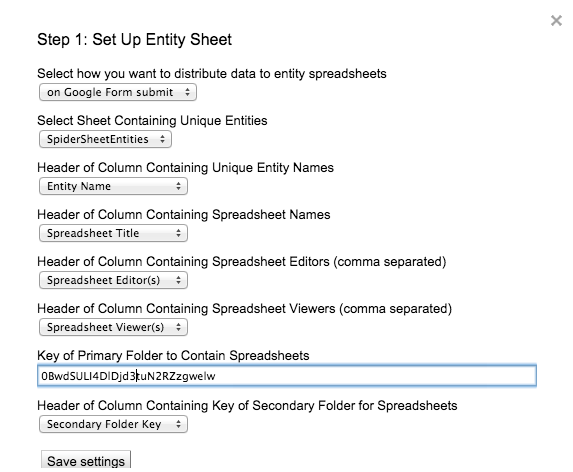
Now it’s time to install the sheetSpider script. Keep in mind that as of this writing, sheetSpider is only available with an  "old" Google Sheet. You must click "tools" > "script gallery" and search for "sheetSpider." A tab named “SpiderSheetEntities” will be created when you install and initialize the script.  Then, click the sheetSpider menu item and proceed to “Step 1: Set Up Entity Sheet.” 


We have to set the script to run on “Manual Push” because we are using the copied timeline sheet to trigger sheetSpider instead of the form responses sheet. All of the items in Step 1 can match to the columns in the “SpiderSheetEntities” tab that was already created. You might want to create a folder for your satellite timeline sheets and paste the folder ID into the “Key of Primary Folder…” field.


Now proceed to “Step 2: Provision/Update…” In the first field, paste the document Key of the Timeline JS template. The feeder sheet needs to be set to “od1” which is the tab that we copied over from the template. The unique entity name can be set to “Media Credit” which is where we fed in the student usernames. At this point, click the “Save and Provision…” button.


“Step 3: Disagregate and Push Data” is the last sheetSpider step we need. Make sure your settings are “Manual Push” and “Append only new unique records.” The uniqueness criterion can be both “Start Date” and “Media Credit” to ensure uniqueness. Running Step 3 will create the satellite sheets. You will need to publish those sheets for the timelines to work.


Now lets connect the timelines.  Open the “SpiderSheetEntities” tab and insert two columns to the right of Column F. Name these “Timeline Embed” and “Timeline Link.”  Then, add one column to the right of “J” and name it “Spreadsheet Key.”


Paste the following function into K2:


=ARRAYFORMULA(right (I2:I,23))


Paste the following function in G2:


= ARRAYFORMULA ( IF (A2:A = "", "" , "<iframe src='http://cdn.knightlab.com/libs/timeline/latest/embed/index.html?source=" & K2:K & "#gid&font=Bevan-PotanoSans&maptype=toner&lang=en&height=350' width='100%' height='350' frameborder='0'></iframe>"))


Then, paste the following function in H2:


= ARRAYFORMULA ( IF (A2:A = "", "" , "http://cdn.knightlab.com/libs/timeline/latest/embed/index.html?source=" & J2:J & "&font=Bevan-PotanoSans&maptype=toner&lang=en&height=650"))

These last functions complete the project.  Student submitted exit tickets are aggregated to personal spreadsheets, and once the spreadsheets are published, they are used to create embeddable timelines. The embed code works great but not in a Google Site. Use the "Timeline Link" and the iframe gadget if you are using a Google Site. Let me know if you use the project or make it better!