Sunday, February 15, 2015

Finally, Google Docs Speech Recognition


I’ve been looking for a free speech recognition tool to use with Google Docs since the unveiling of Chrome extensions. The time has finally come with the Docs Add-on “Speech Recognition.” I’ve used the tool with several 8 and 9 year old students and have found it easy to operate and remarkably accurate.


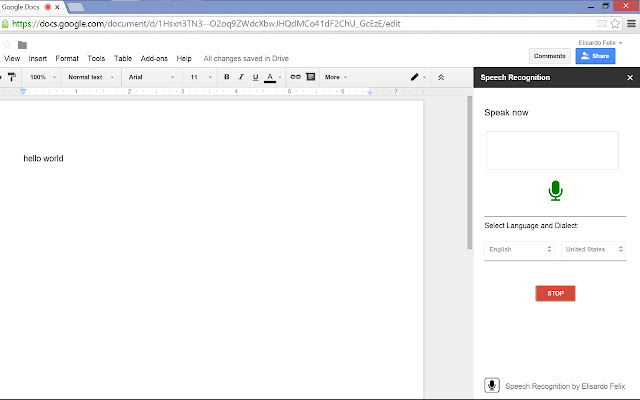
Speech Recognition appears in the Add-on menu after being installed from the Gallery.  Once started, a speech recognition sidebar opens that allows the user to specify the language being spoken. In addition to handling English well, I’ve heard from my World Language colleagues that the Spanish recognition is quite good. The Add-on begins to work with the click of a start button and stops by using the same button. Punctuation is included when the user verbally declares where it should be (edit: some folks have reported that punctuation is a weakness, see the comments...)


Accuracy has often been a challenge for speech recognition tools that aren’t trained to understand the speaker, such as the capable Dragon Naturally Speaking. Accuracy is also a challenge when the speaker has a young voice or doesn’t project well. I found neither to be the case with this add-on.  One soft-spoken young lady was having trouble typing the non-fiction book that she was working on. She was able to clear through three chapters after using “Speech Recognition.”


Students often do not verbalize the punctuation, so it is necessary for them to reread and make edits where necessary. Mumbling can also be misunderstood. I actually consider both of these deficits a feature and enjoyed watching our young writers reread their work and revise.

At the risk of being hyper-critical, I would love to see this add-on utilize keyboard shortcuts. I do not know what kind of technical challenge that presents, but it would be highly beneficial for users who have trouble manipulating a mouse. So far, this is my only criticism of this capable and user-friendly tool.

This has been cross-posted at the Chrome Toolbox.

Sunday, February 8, 2015

A Rebuild of the Moderated Twitter Form


A few months ago I blogged about a system that would allow students to tweet to a class Twitter feed after teacher moderation. Since that post, the good folks at the +New Visions for Public Schools Cloud Lab rebuilt Form Mule (an important component in the system) to work in the new Google Sheets. This post will explain how to build the Twitter Moderator system using the New Sheets, which I highly recommend you use. A few teachers asked for a video tutorial. I like a tutorial that I can read so I created both. I hope it's helpful!


This recipe has five components:
  • A simple Google Form linked to a Google spreadsheet
  • The FormMule Addon from New Visions for Public Schools
  • A Gmail account created specifically for this process
  • An If This Then That recipe
  • A classroom Twitter account


First, create a simple Google form with a paragraph text question for the exit ticket. This PDF from Classroomfreebies was the inspiration. I used data validation to set the maximum character count of the question to 140 (this is a simple but important step.) Click “Require [Your Domain] to view this form” and “Automatically collect respondents username” if you are using this with students. Now, click “view responses” at the top of the form edit window to open the Spreadsheet attached to the form.


Then, add a column labeled “Moderated” to the responses sheet and install the New Visions FormMule Addon. Click “addons” in the menu bar, then “formMule”, then “Launch.” Once launched, select the Form Responses sheet for the source of merge data. Then, activate the time based trigger switch and set the trigger to run every hour. Click “Next: Templates and Send Conditions.”


We are only going to be sending one type of email. Change the send condition to point to the “Moderated” column. I usually use “Not Null.” This means that anything typed in the “Moderated” column will send the corresponding tweet to your Twitter account. If you want to be more specific, use a command like “yes.” Then, click “Next: edit templates.”


The email template is very simple. Click into the “To:*” field and add the GMail address that you created for this project. Click into the “subject” field and set this as well. Personally, I like using the Timestamp as the subject. You may also want to use the username. Then click into the “body:” field and then click the “What would you like to tweet about today?” tag. Finally, click “Preview and send all.” The Google side of the system is now done! Now we need to set If This This Than That (IFTTT) to send moderated tweets to Twitter.


Log into IFTTT, your new GMail account, and your class Twitter feed. Return to IFTTT and open this recipe. Once you add the recipe you will need to connect IFTTT to the Twitter and GMail accounts. Once the recipe is activated, scroll down on the edit window to the trigger and set the address to be the same GMail account you used in formMule. Click “Update” and you are done!


There you have it - the updated Twitter moderation feed using the new Google Sheets and formMule Addon. As before, let me know if you use it in your classroom! If you think of a way to make it better, let me know about that, too!