Sunday, October 25, 2015

Animated Student Portraits Using Biteable


Sometimes things just line up. About a month ago I got an email from one of my 5th grade teachers asking for help. Her students had been learning how to ask good questions and interviewing each other.  She wanted a quick way to present this information. We all know that time is at a premium, some projects have to be quick. It just so happened that I read about Biteable that weekend. Kismet.

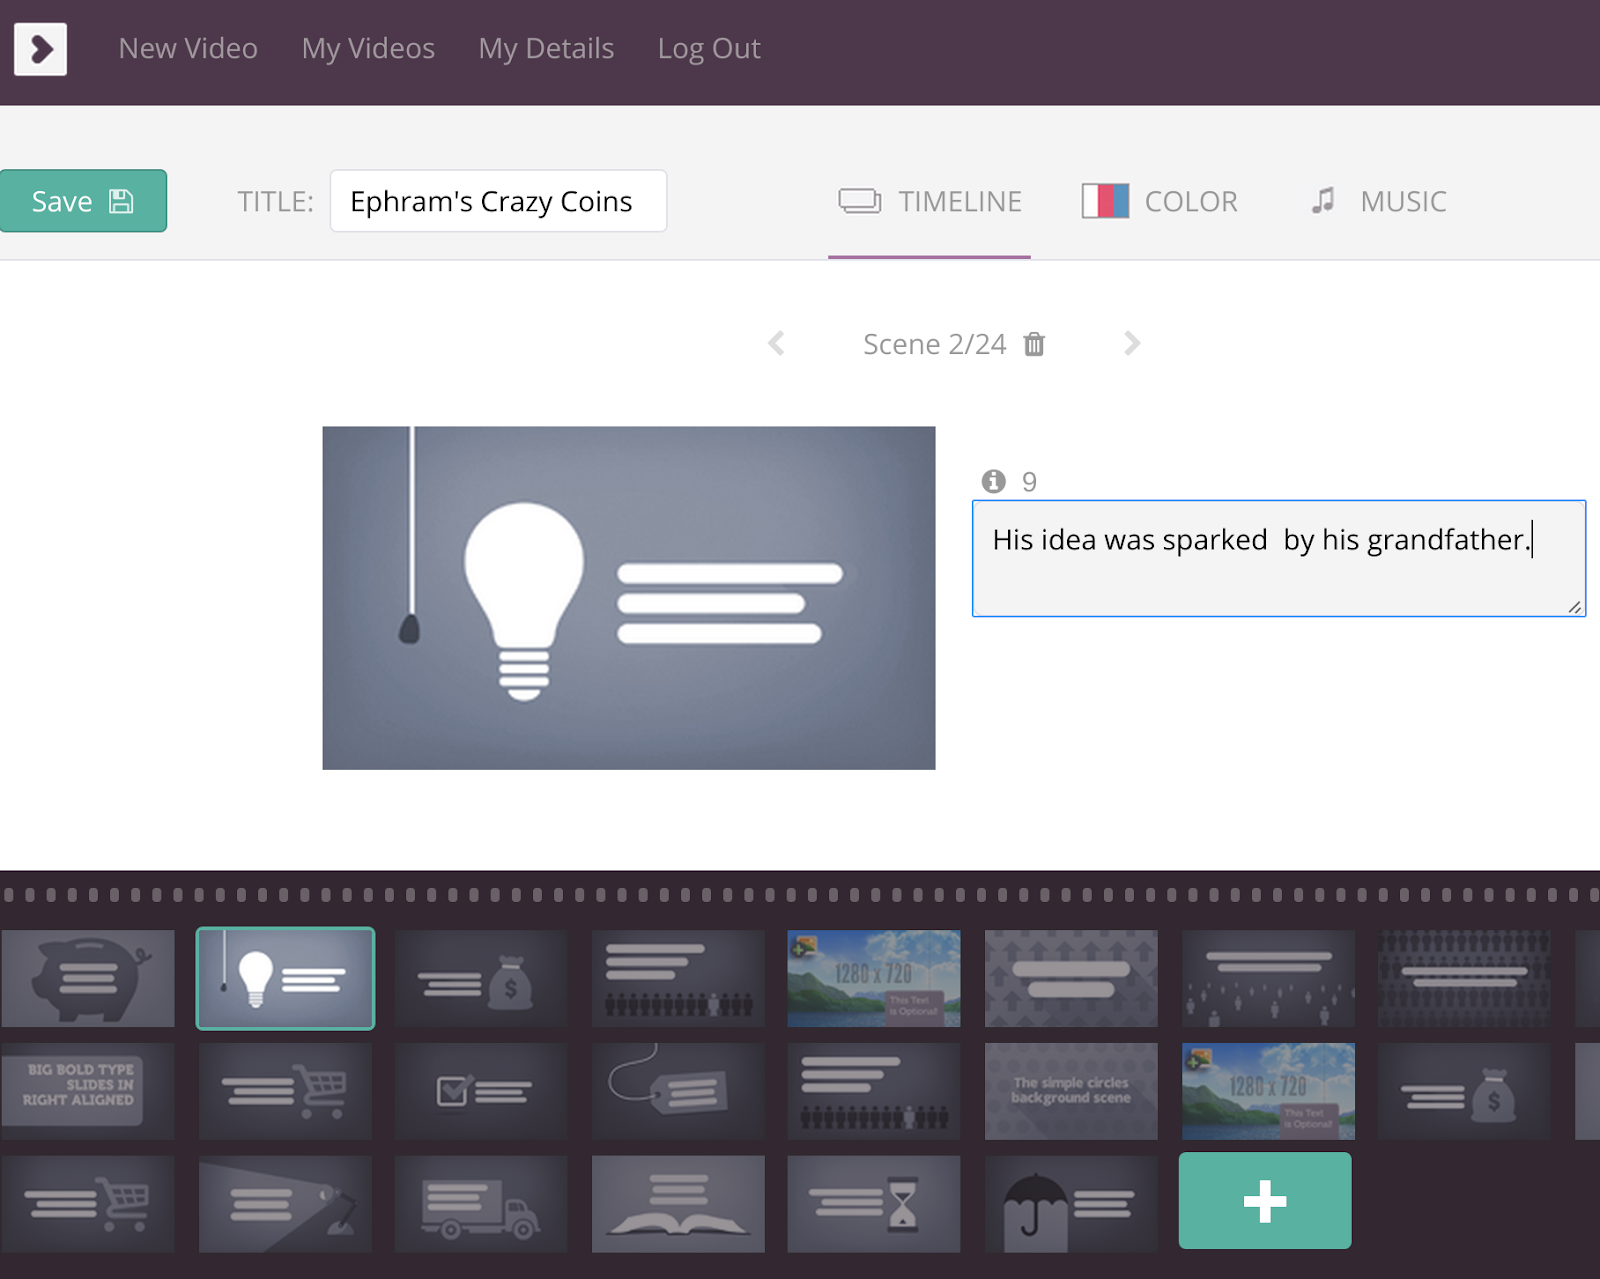
Biteable is a site that provides a library of quick animated slides. Users decide on the slides that best communicate their message and pair them with short strings of text. The slides are well designed and the brevity of the text (50 characters per slide) reinforces the “show, don’t tell” philosophy of design. Students also choose music to accompany the movie. The end result is something students can be proud of.


We created a single account using the teacher’s email and a generic password. Each student used this username and password to sign into the account and create a Biteable for their interview. The shared account did a few things:
  • The teacher had access to all the biteable movies
  • The account was connected to the teacher’s YouTube account, something that isn’t turned on in our student sub-organization
  • When a movie is ready, each student sends an email via Biteable to the teacher, giving the teacher control over when the movies are “published”
  • The shared account meant students had to respect each other’s work. This reinforced digital citizenship and our class rose to the occasion.

Students started by referencing the slide library and planning their movie with a storyboard graphic organizer. The graphic organizer was created in a Google Drawing and can be printed or used digitally.  The storyboards helped students think purposefully about their slide choices and the logical flow of the movie.

The text constraint of 50 characters per slide also presented an interesting teaching point. Students had to synthesize their notes into the most important ideas. Even then, ideas often needed to be stretched across slides. Students were taught to do this smoothly by using sentence connectors. Another lesson developed from the students’ sentence starters which tended to use a pronoun or the name of the child.  Students revised their work by placing the adverb phrase or predicate first.

The finished products are beautiful animated portraits of the interviewed students. Because the process was so easy, the focus of instruction was on craft and not the tool. It was also efficient; students typically finished the first draft of their movie in two days and took another two days to revise. I’m looking forward to using Bitable again, let me know how it goes if you try it with your class!

Sunday, September 20, 2015

Embedding a Google Folder Into Your Teacher Site


Picture, Insert, Embed, Edit,

Embedding a Google Folder is one of those things that is easy to do in a Google Site, but takes a little tinkering for other types of websites. My school system uses the SchoolWires CMS and my teachers routinely embed Google folders for newsletters, parent forms, and photos. This elegant solution makes updating your teacher site painless; just add the newsletter to the folder and it appears on your website. Lets look at how it’s done. If you are comfortable with creating and sharing Google folders, skip to Step 4.


Step 1


Blog GFX embeddable Folder.jpgThe first step is to create the folder in Google Drive and name it appropriately. Simply go to https://drive.google.com/ and click the red “Create” button on the left. Then, select “Folder.” Once you have named this new folder, it’s time to share it.


Step 2
Blog Post Gfx Share Folder.jpgFind the folder you’ve created in your Google Drive and double click to open. Once open, you will see breadcrumbs at the top telling you the path to this folder. This will look something like “My Drive > Your Folder Name.” Next to the name of your folder is a down-pointing arrow. Click this arrow to see the folder options menu. Then click "Share."


Step 3
The “share” window will appear. Find the small “Advanced” link on the bottom right and click this. The Advanced window will give you a few choices. The embedded folder will behave according to the sharing permissions that you set. From here you can share with specific people, share with a group, just your domain (if you are a GAfE school,) or make the folder public. We are going to make the folder public so that anyone visiting the website can see the contents. Click “Change” next to “Private - Only you can access.” Then, click the radio button next to “On- anyone with the link.” Press “Save,” then “Done.”


Step 4
Now that the folder is shared, you need copy the Folder ID. This is the string of letters and numbers at the end of the folder URL, after the last “/.” Select and copy this.
Blog Gfx URL.png

Step 5
With the folder ID copied, we are ready to create the iframe code. In the snippet below I have changed the color of the variables.


<iframe src="https://drive.google.com/embeddedfolderview?id=0BwdSULI4DlDjY3JEdHBtb0F1NXc#grid" width="100%" height="400" frameborder="1"></iframe>


  • The green text is where you paste your folder ID. Replace what’s there with your own.
  • The red #grid can also be #list. This changes how the iframe looks within your site.
  • I like to keep my iframe widths at "100%" so that the iframe will expand to the available space. You could also use a fixed width by typing in a set number of pixels.
  • Set the number of pixels that you need for the height. This might require some trial and error. ;)
  • Finally, set whether you want the iframe to have a border. If so, a small pixel number is best, 1 or 2. Otherwise, leave it at "0."


Once you’ve edited your version of the iframe code above, copy and paste it into the HTML version of a webpage. For my teachers, they have to log into Schoolwires and navigate to the page where they want to embed the Google folder. Then, they have to click a “HTML” button on the page editor. This will open the HTML version of the page and they can paste in the code. I've added the above code to the bottom of this post.


That’s it! Despite the length of this post, it is really simple. Especially if you already know how to create and share a folder. One tip, the iframe will always sort alphabetically and this is not always ideal. I tell my teachers to number or date the files that they add to the folder so that they show in the intended order. I hope this is helpful, let me know if you’ve used a folder iframe!


Our Google Folder Embed:

Sunday, September 13, 2015

A 3-5 Non-Fiction Google Template with Text Features


This week I am rebuilding a 3rd grade non-fiction book Doc that I created last year. I've learned some important lessons and I think I've made it much easier for students to create killer books. The biggest lesson revolves around how Google Drawings are used.


Last year my template was simple and included a cover page, a copyright page, a dedication, and a Table of Contents. Non-fiction text features were supported with a Google Sites page that linked to Google Drawing templates. It worked fairly well. The students created beautiful books and were deservedly proud of their work. Using Google Drawings for Nonfiction text features was easy, except when it came to inserting them into Docs. Unfortunately, Docs doesn’t allow a student to insert a Google Drawing file created from Drive. Students needed to save the drawing as an image file and then insert the image into the Doc. Not only does this create an awkward step, it also makes revising the text feature a chore. I’m sure Google will smooth this out sooner or later, but for right now, I don’t want to relive the process.


My Non-Fiction file for 2015-16 is completely built in a Doc. The text feature templates are added at the end of the doc; no more sending students to the web page. When students need a text feature, they scroll to the bottom and copy/paste one of the templates (or create their own using the “insert -> drawing” menu.) As far as I can tell, the only difference between a Doc Drawing and a Drive Drawing are tables: Drive Drawings have them and Docs Drawings don’t (please let me know if there are other differences.) Other changes to the original template include a “Glossary” page and an “About the Author” page.


Students are instructed to start writing on the first chapter page (page 4, not including the cover) and create new chapters as necessary. The “Hand” graphic organizer at the top of the first chapter is also a Google Drawing and will help students with planning. This can be copy/pasted into each new chapter.


We have some time until this unit happens and I’m sure the file will be revised before it’s used. I’m looking forward to collaborting with my third grade team and our ELA Helping Teachers. Let me know if you use the Doc and please share it back out if you make it better!


Additional Resources for Google Drawings in the Classroom:

Saturday, September 5, 2015

Calendaring Weird Schedules with formMule


It’s that time of year when I build the schedules for my school in Google Calendar. My school uses a six day cycle (A,B,C,D,E, and F) which does not conform with Google Calendar well. This system allows you to use an unusual schedule to fill in a Google Calendar for the year. Each year I try to rebuild systems like this to make them a little better. In this case I’ve updated the dates, cleaned up some of the functions, added a directions sheet, and most importantly, used the new formMule script that’s built into the new sheets. Another big shout out to +Andrew Stillman and the New Visions Cloud lab team, without them this would not be possible.


This system requires some set up and I’ve tried to make it easy to play along. Please let me know how I’ve done. You can make a copy of a clean sheet by clicking here. From this point on I will be linking to a demo sheet that is already set up.


By default, the sheet is prepared for a six day cycle, though you can create any cycle by customizing column “A” of the “Teacher Schedule” Sheet. Next, you have to update column “D” of the “Day Cycle” sheet. I recommend adding your holidays first (delete mine) and then work your cycle around them. The rest of the set up is outlined step by step on the directions sheet. This demo sheet was used to create this calendar.

This system works well for me; I use it on the elementary level to create special area schedules (PE, Art, Music, etc.) That said, it might not fit your needs. You might also want to look at the inspired work of Christopher Webb. His Google Calendar Import Tool is nothing short of amazing. There’s also a rumor going around that James Peterson is working on an add-on for this kind of thing. I am eagerly anticipating that! Please let me know if you use this system, find a bug, or can think of a way to make it better.

Sunday, July 26, 2015

Timeline Maker 3, Beautiful Timelines Through a Google Form


I promised the good folks who attended my session at ISTE (thanks for coming!) that I would update the Timeline Maker system for the newest version of Timeline JS. I wanted this version to be as accessible as possible so I built in a control panel to guide teachers through the setup process. This system uses a Google Form to create a beautiful interactive and embeddable timeline.


Timeline JS is a beautiful tool that transforms a Google Sheet into an interactive multimedia timeline. This system streamlines the process by using a Google Form to create the timeline. It also uses the incredible sheetSpider script, programmed by Andrew Stillman from New Visions for Public Schools. SheetSpider will create multiple timelines from the same form, making the system function for group work or individual students.


Set Up
First make a copy of the Timeline Maker. This was built for schools and assumes that you are copying it into an Edu Domain. As such, it has been developed to work with recorded usernames. This can be used outside of a domain, but will require some minor tinkering.


I really want to make this system as easy to use as possible. The sheetSpider script is powerful, but I think it can be confusing, especially if you want to control how it works. I created a “Set Up” sheet that takes teachers through the process step by step. Via this sheet, the system can be set up to create one timeline for the class, for small groups, or for each student. The “Set Up” sheet also allows teachers to turn on moderation, allowing submissions to be vetted before they get to the timeline. I’ve linked to two example sheets below, one set-up for small groups and another set up for a whole class. The data came from the good folks who attended my ISTE presentation.


Whole Class Timeline From Example


What’s next?
I didn’t involve any scripts or add-on beyond sheetSpider in the effort to keep this as simple as possible. In future iterations I hope to do the following:
  • Install formMule and record the edit form link
  • Have the system email the student if something needs editing (via formMule)
  • Have formRanger update a Student Name question with each submission
  • Tie it into the Twitter Google Form system so that exit tweets are recorded in a timeline.


The time was right for this revision. The goal was to build a system for teachers who might not be Google Sheet ninjas yet, but still want Timeline JS goodness powered by a Google Form. This is the first time I’ve tried to approach a system this way, please let me know if it works for you!

Edit: Giant thanks to Dan Crowley and Kelly Kermode for their help chasing down some bugs. If you experience any trouble, please let me know in the comments. (7/28/2015)

Edit 2: Fixing old bugs made new bugs! Thanks to the help of Stephanie Schroeder I was able to debug them. Once again - if something doesn't seem right, leave a comment and let me know. Thanks! (7/30/2015)

Saturday, June 27, 2015

The Finished Book Igloo


Here is our finished book igloo! Our Stop motion video is posted below. I'm really proud of how the students at Quaker Ridge rallied to build the platform, prototype the igloo, and eventually put it together.  We've dedicated the igloo to Robyn Lane, our principal, who has retired after leading us for ten years. It will be a favorite book nook in our library for years to come! You can read more about the process here.

Saturday, June 20, 2015

The Up! Mini 3D Printer Prints Well, Has Lousy Documentation

IMG_20150317_182905394.jpg
The 3D printer farm at Georgia Tech's Invention Studio


I learned about the Up! 3D printer at the Georgia Tech Invention Studio, where it was the printer of choice in their printer farm. If you are ever in Atlanta, I recommend calling the Studio and asking for a tour; it’s an inspiring space run by even more inspiring students. The University Lab Instructors were really positive about the Up! and we decided to give it a shot. We got ours a few days ago and this is my first reaction to the printer.


Set Up


IMG_20150616_130454315.jpg
Students unboxing the Up! printer
The Up! comes nearly set up, which is welcome. A test print is waiting for you on the printing plate indicating that the printer had gone through some quality assurance before being shipped. Unfortunately, the quick start manual that comes with the box is really lackluster. It seems to have been poorly translated (TierTime Technology is a Chinese company) and there’s quite a bit that you have to figure out for yourself. Thankfully, the two students who were in charge of the set up are swift. I highly recommend going to the Up! support page to download the full manual straight away. Interestingly, the quick start manual does not mention the existence of the online manual or the need to download the software from the website. Once downloaded, the software installed easily on our iMac, but I’ve heard people have had problems on PCs.


The First Print
Feeding the filament into the extruder is simply done, I’d say it’s easier than our MakerBot. The extruder heats up quickly and starts to push out ABS filament in the same color of the test print that was on the plate. You initialize the printer by holding done the power button, causing some loud beeps to indicate the process is underway. It's so loud, in fact, that I flinched in our library, casting guilty glances at our librarian who was in the middle of a lesson. Calibrating the nozzle has been more difficult than it needed to be. The steep learning curve is a direct result of the lousy documentation. The quick start guide provides no direction and the manual doesn’t help much either. It is recommended to calibrate the nozzle 2mm from the plate but a visual reference would go a long way. If the nozzle is too far from the plate the model will not adhere well to the perforated plate. This will cause edge curling and the ultimate print failure on larger jobs. Through much trial and error, I’ve found that the nozzle has to be really tight to the plate - just a little more than the thickness of paper.


The plate is supposed to heat to help the model adhere. This is a great idea but it seems like the mechanism is not powerful enough to do this adequately. It often requires long preheat times (up to an hour) and even then it’s lacking. Users familiar with the printer often replace the stock heat switch with a more powerful one. I don’t want to wait an hour to print and I’m not sure that I want to upgrade the switch either. For now, I’ve found that Cube Glue works great to keep the models on the plate while printing.

Accessories
The Up! comes with a great set of tools to remove and clean finished prints. I really appreciated the quality gloves, scraper and exacto knife. Up! also provides Allen Keys and Nozzle Wrenches to help you repair or modify the printer. This sends the right message: take control of this printer - fix it, improve it, take it apart and put it back together again. I especially appreciate the downloadable spare parts library allowing users to print their own replacement parts.


IMG_20150618_141455642.jpg


Quality
The Up! does a nice job with it’s prints, producing smooth models with decent detail. The print area is on the small side, at 4.7 inches cubed. I like that the printer can use both ABS and PLA filament. Mechanically speaking, the printer is great. The nozzle seems to be maintenance free so far and the extruder heats quickly.  The filament feeds easily. The plate heater is disappointing but at least there is a solution.


Conclusion
The Up! 3D printer is a good deal at $600 but there are some things to consider. Model curl and print failure can easily happen if you don’t have the nozzle calibrated correctly, which has a steep learning curve because of the documentation. You should also heat the plate or use 3D glue to keep the print from curling. If you don’t want to deal with the calibration you might want to look at the Up! Plus 2 because it levels and calibrates automatically. The Plus 2 costs twice as much at $1299.

Monday, June 8, 2015

Building a Book Igloo

Miler Lagos' work "Home" and our inspiration


Our school’s library was in need of book weeding. There were encyclopedias that were twenty years old, books that hadn’t been checked out in thirty years, and some that were just plain falling apart. In fact, there were hundreds of books like this and it just didn’t seem right to throw them out.  It all became clear after our school librarian, Kate Byrnes, discovered this installation by Colombian artist Miler Lagos. This what we needed to do. We needed to mobilize our Young Maker’s club and build a book igloo.


IMG_20150423_162837191.jpg
Book Igloo prototype


Having never built such an igloo before, it was important to build a prototype. The Makers Club adeptly stacked books over the course of two afternoons (informed by lots of Minecraft practice) until the igloo began to show signs of structural failure. They did a great job and the prototyping process was really informative. When we started we focused on the width and length of the books. Our test made it clear that it was the thickness that was truly important: each row needed to be built with similarly thick books.


IMG_20150512_163457807.jpg
Maker Club building the igloo platform


Then the kids helped me build a platform for the igloo. We want the igloo to be movable in order to keep the library space flexible and for more practical reasons, like cleaning the rug. I was especially proud of one of our middle school helpers who figured out how to build a brace for the casters.


IMG_20150601_103346687.jpg
Students answering the question, "What does reading mean to me?"


Once the platform was ready we had students use sharpie markers to answer the question “What does reading mean to me?” Their answers are amazing and they add a warmth and personal feeling to the project. Our book igloo is becoming an art installation like Miler Lagos’ work. Unlike Lagos’ igloo, ours will be permanent. Each book will be glued into place by construction adhesive creating a book nook where students can enjoy reading. The igloo will be a centerpiece of the library next year and I’m looking forward to blogging about the finished project as soon as it’s done.


Tuesday, June 2, 2015

A Google Slides Student Museum


Back in March I had the good fortune of sitting in on +Caren Macconnell’s Google Summit workshop on Choose Your Own Adventure Using Google. Caren did a great job and really got my wheels turning - you can do a lot with this kind of interactivity and it shines in the classroom.


In the past I've used a wiki to create interactive stories like this. It worked pretty well but graphics were more complicated than they needed to be and students couldn’t work on the same page at the same time. Google Slides is a much more flexible and user-friendly tool.

Creating non-linear links or buttons in a Slides presentation is a snap. Just select the text or shape that you want to link to another slide, click the link button, then select the destination slide. This process is even easier if you title the slides beforehand.

This came in handy recently after a local artist visited one of our second grade classrooms. Caren shared a museum template during her Summit workshop that becomes a great showcase for student work and reflections. This was the inspiration for the Museum at QR Slide deck embedded in this post.


Like Google Drawing, slides is an under appreciated tool. I think Slides is sometimes mistaken as limited because it’s easy to use. Don’t fall for this trap, nothing is further from the truth.