Monday, March 28, 2016

Social Bookmarks using a Google Form & Awesome Tables


Last January I had the pleasure of attending a Teacher’s College workshop hosted by Dr. Heidi Hayes Jacobs.  Dr. Jacobs reminded us that the process of evaluation, selection, and categorization is especially valuable in our information rich world. She encouraged us to help our students curate their own web experiences. Inspiration struck: I thought, “Why not create a social bookmarking tool for elementary students using a Google form?” I wanted to create a student-centered alternative to the static list of links that are often found on teacher sites. This post is the result of that inspiration.


Inspiration is not an individual endeavor.  If Heidi Hayes Jacobs helped me to think of the what, then +Baptiste Quin showed me the “how.” Baptiste generously shared an Awesome Table experiment, gorgeously modeled after Google Keep. He opened my eyes to the potential of using CSS with Awesome Tables and provided the perfect starting place for my project. So, a big thanks goes out to Baptiste.


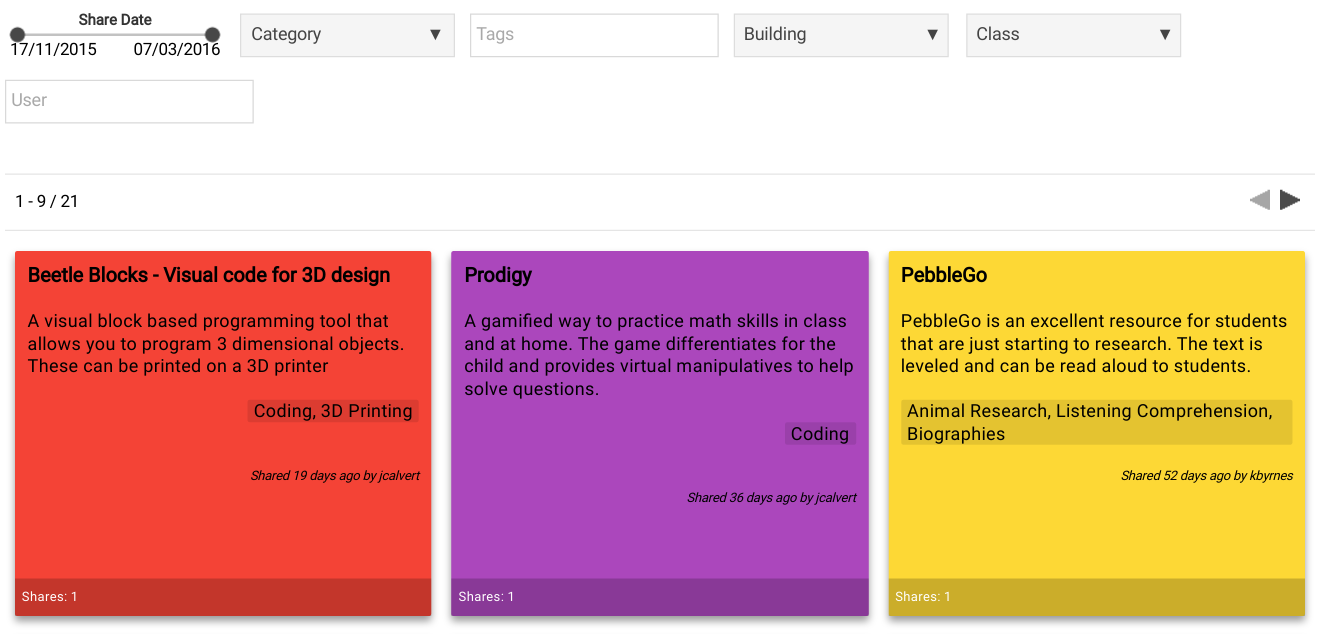
My remix of Baptiste’s work edits out some of his features (which are very cool in their own right, but didn’t quite fit my project) and adds others. Each bookmark “card” has a title, a description, information tags, how many times the bookmark was shared, who submitted the site and when. Students share bookmarks using a Google Form. I tried to design the form to be as short as possible to make adding a bookmark easy.  The Google Sheet compares usernames (collected automatically from the form) against a list to determine the submitter's building and classroom. To further simplify the process, I’ve created a simple Chrome extension that will open the form and pre-fill the title and url of the current page. I’ll blog about this extension in another post.


I’m really excited about this system. The chrome extension makes it easy to add new sites on the fly and the Awesome Table can be embedded on any website. I’ve added the bookmark interface into our edublogs student template so that each student blog has ready access. This connects all of our students and becomes a vehicle to teach the new ISTE standard for Knowledge Curation. Feel free to copy the demo sheet and make it your own. I wrote a brief instruction page in the sheet for anyone who wants to give it a whirl, but I’ll be writing step by step directions in an upcoming post. Let me know in the comments if you use this idea, make it better, or find a bug - it would be much appreciated!


Monday, March 21, 2016

Build a Commenting system With These 5 Spreadsheet Tips


Google elevates the humble spreadsheet by bundling in forms, multi-user capacity, and the inherent connectivity of the Internet. This combination gives Google Spreadsheet application authoring-like chops. This post is going to explore this idea by making a moderated comment system using a few spreadsheet tricks.


You might ask, “Why?” Well, this system uses some functions that I use a lot, so it's a handy vehicle to talk about them. That said, there are reasons why we've used this at Quaker Ridge. Some sites don’t have built in commenting features, especially sites built on education content management systems. Other platforms, like Google Sites, have comments, but they can’t be moderated. Systems like Disqus are popular and powerful, but give you little control over what is done with your data. This is gross in general, but it’s particularly foul in the K-12 edu space. Finally, it can be more communal than a blog post comment. We can create a meta comment feed that insulates young children from the “I don’t get any comments but my friend gets so many” problem. So here you go, 5 tips to make your own comment system!


Tip 1: Use Validation!
Every good comment system needs a form to submit. My comment form has three questions, a teacher name drop down so that the comments can be filtered by class. An optional text box so that the person commenting can leave a name if wanted. And a paragraph text box for the comment. This last item is validated (click the advanced settings under the question) to 280 characters. I figure that twice the length of a tweet is enough to ask a question or provide feedback, but adjust accordingly.


Validation Gif.gif


Tip 2:  Use a QUERY for Moderation
I use this trick often. You’ll also find it in the Twitter Exit Ticket and the Book Review form. A query will take data from one page and display it on another, based on criteria that you declare. This criteria could be a number rage, or specific values, and can use boolean operators such as “OR” and “AND.”  I simply add a “Moderation” column to the right of my form sheet. Then, I add a query to a new sheet that watches this column for a value of ‘yes.’


=QUERY(data!A1:E, "where E = 'yes'",1)


This sheet is what gets sorted by the comment page. Since I use one system for several teachers, I include the “AND” operator to also look for a specific teacher’s name.


=QUERY(data!A1:E, "where E = 'yes' AND B = 'Teacher 1'",1)


It’s useful to learn how to write a query, but until you do, just use Bjorn Behrendt’s very cool EZ Query add-on.


Tip 3: Reverse the Order of the Comments
When someone submits a Google Form, the last response shows up under the previous submissions. Typically, you want the opposite with comments, with most recent submission first. We can use a SORT function to change the order. Add another sheet and sort the approved comment range using the timestamp column (represented by the 1) as the sort by column.


=ArrayFormula(sort('Tip 2: Moderate'!A2:D, 1,false))


Tip 4: Join Columns With Linebreaks
A comment system will often include who made the comment and the date the comment was submitted. Unfortunately, these items are in different columns. We need to join these together and do it in an attractive way. Columns can simply be joined by using the “&” symbol. However, we also want the columns separated with carriage returns - otherwise it would look crowded. The character code for a return is “CHAR(10).” We’ll use two together to create a space between the name and the comment..


=ArrayFormula(sort((" By: ")&'Tip 2: Moderate'!C2:C&CHAR(10)&CHAR(10)&'Tip 2: Moderate'!D2:D&CHAR(10)&CHAR(10),'Tip 2: Moderate'!A2:A,false))


Tip 5: Test for Blank Rows
The last function joined all of the rows, whether or not there was a comment. This left hundreds of orphaned “By:’s” from all those empty rows. Since we only want the function to apply to rows with comments, we can use an “If( ISBLANK( ‘Column’),”  test. This combination will look at a column, 'Teacher 2 Approved Comments'!C2:C in our case, and check each row for blanks. If a blank row is found, then nothing is done ("".) However, if something is found in a row, we can execute the joining formula from earlier to construct the comment.


=ArrayFormula(sort(IF(ISBLANK('Tip 2: Moderate'!C2:C), " ", " By: ")&'Tip 2: Moderate'!C2:C&CHAR(10)&CHAR(10)&'Tip 2: Moderate'!D2:D&CHAR(10)&CHAR(10),1,false))


Ready for Publishing
Untitled GIF (1).gif


Now your comment page is ready to publish! Just click “File > Publish to the Web.” Select the comment page to publish and grab the Embed code. Then, paste that into any website that needs a moderated comment system! I’ll often set up the formMule add-on so that new comments will send an email to the teacher. Don’t forget to link to the form, too, and thanks for getting this far! Let me know in the comments if you have any questions.

Friday, March 4, 2016

What if the Founding Fathers had Facebook?


It’s Founderbook time again! During this unit, our 5th grade students use a Google Site to take on the persona of one of the founding fathers, create a facebook-like profile, and then blog from the perspective of the founder. This time I’ve got a new Google Site template with improvements based on what we learned last year.


This year my fifth grade teachers added to the instructions page. The instructions page offers a nice reference while students are working independently. One addition that I liked a lot was the “Speak like a Founding Father” section. The kids really enjoyed using these tips to get into character.


Adding information to the Founderbook page is just the beginning.  The real fun comes when the children use the announcement pages to blog in the first person about their founding father’s experience at the Constitutional Convention. At the end of the unit, students come to school dressed in period clothes, read each other’s posts, and leave comments on their friends blogs, all while staying in character.


Next year I’d like to take better advantage of this anachronistic Colonial Day. The students do a great job dressing as their founder and I’d like to leverage that more effectively. How great would it be if the students used Google Hangouts to stage and record Constitutional Convention debates?


All in all, this continues to be a great unit. Students really get into researching their founder and writing from a historical perspective. Let me know if you use our template or if you have questions in the comments.