Showing posts with label Google Scripts. Show all posts

Sunday, February 8, 2015

A Rebuild of the Moderated Twitter Form


A few months ago I blogged about a system that would allow students to tweet to a class Twitter feed after teacher moderation. Since that post, the good folks at the +New Visions for Public Schools Cloud Lab rebuilt Form Mule (an important component in the system) to work in the new Google Sheets. This post will explain how to build the Twitter Moderator system using the New Sheets, which I highly recommend you use. A few teachers asked for a video tutorial. I like a tutorial that I can read so I created both. I hope it's helpful!


This recipe has five components:
  • A simple Google Form linked to a Google spreadsheet
  • The FormMule Addon from New Visions for Public Schools
  • A Gmail account created specifically for this process
  • An If This Then That recipe
  • A classroom Twitter account


First, create a simple Google form with a paragraph text question for the exit ticket. This PDF from Classroomfreebies was the inspiration. I used data validation to set the maximum character count of the question to 140 (this is a simple but important step.) Click “Require [Your Domain] to view this form” and “Automatically collect respondents username” if you are using this with students. Now, click “view responses” at the top of the form edit window to open the Spreadsheet attached to the form.


Then, add a column labeled “Moderated” to the responses sheet and install the New Visions FormMule Addon. Click “addons” in the menu bar, then “formMule”, then “Launch.” Once launched, select the Form Responses sheet for the source of merge data. Then, activate the time based trigger switch and set the trigger to run every hour. Click “Next: Templates and Send Conditions.”


We are only going to be sending one type of email. Change the send condition to point to the “Moderated” column. I usually use “Not Null.” This means that anything typed in the “Moderated” column will send the corresponding tweet to your Twitter account. If you want to be more specific, use a command like “yes.” Then, click “Next: edit templates.”


The email template is very simple. Click into the “To:*” field and add the GMail address that you created for this project. Click into the “subject” field and set this as well. Personally, I like using the Timestamp as the subject. You may also want to use the username. Then click into the “body:” field and then click the “What would you like to tweet about today?” tag. Finally, click “Preview and send all.” The Google side of the system is now done! Now we need to set If This This Than That (IFTTT) to send moderated tweets to Twitter.


Log into IFTTT, your new GMail account, and your class Twitter feed. Return to IFTTT and open this recipe. Once you add the recipe you will need to connect IFTTT to the Twitter and GMail accounts. Once the recipe is activated, scroll down on the edit window to the trigger and set the address to be the same GMail account you used in formMule. Click “Update” and you are done!


There you have it - the updated Twitter moderation feed using the new Google Sheets and formMule Addon. As before, let me know if you use it in your classroom! If you think of a way to make it better, let me know about that, too!

Saturday, October 4, 2014

Student Timelines from a Google Form using sheetSpider

An update for this project has been posted here.

The goal of this project is to give students a personal timeline of the wonderings and observations that they make using a Google Form. Then, this slick timeline can be embedded in a student portfolio. This project can be integrated into the moderated Twitter exit ticket that I blogged about a few weeks ago, or it can stand alone.


Here is what you need:
  • A simple Google Form linked to an “old” spreadsheet that required students to sign into your domain.
  • The SheetSpider Script from New Visions for Public Schools (thus the “old” spreadsheet)
  • An affinity for nice looking timelines


I can’t wait to implement this in my school, and hopefully build it into some student portfolios. One word of caution: this system needs the student satellite sheet to be published to the web in order for it to be read by the Timeline application. The next section explains how to do this yourself, step by step. There currently isn’t a moderation component although one could be built in, similar to the one used for the Twitter system.

So How Does This Work?
SheetSpider is a nifty script that lets you distribute values to multiple sheets based on a criteria - in this case the criteria is the student Google ID.  Based on this ID, sheetSpider will send each student’s exit ticket responses to a unique Sheet for that student. SheetSpider can be set to use a template when making the satellite sheets and we will use the template file from Timeline JS. If you haven’t seen this Timeline creator, you should.  It does a beautiful job.


Make a copy of the Timeline template and then use the “copy to” feature to add the sheet to your “Exit Ticket” sheet file. The timeline sheet has more columns than we need for our simple exit ticket form, but we need the whole template when we copy the student submissions to the satellite sheets. Specifically, we want to send the form response timestamp to the “Start Date” column, the exit tweet column to the “Headline” column, and the username column to "Media Credit." A simple function like the one below can move the data from tab to tab, you'll see it at the top of the previously mentioned columns in the demo sheet.


= ARRAYFORMULA ( If ( 'Form Responses 1'!C2:C = "", "", 'Form Responses 1'!C2:C ) )


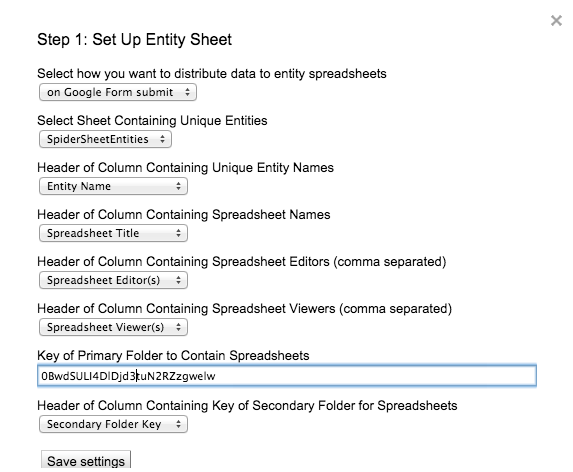
Now it’s time to install the sheetSpider script. Keep in mind that as of this writing, sheetSpider is only available with an  "old" Google Sheet. You must click "tools" > "script gallery" and search for "sheetSpider." A tab named “SpiderSheetEntities” will be created when you install and initialize the script.  Then, click the sheetSpider menu item and proceed to “Step 1: Set Up Entity Sheet.” 


We have to set the script to run on “Manual Push” because we are using the copied timeline sheet to trigger sheetSpider instead of the form responses sheet. All of the items in Step 1 can match to the columns in the “SpiderSheetEntities” tab that was already created. You might want to create a folder for your satellite timeline sheets and paste the folder ID into the “Key of Primary Folder…” field.


Now proceed to “Step 2: Provision/Update…” In the first field, paste the document Key of the Timeline JS template. The feeder sheet needs to be set to “od1” which is the tab that we copied over from the template. The unique entity name can be set to “Media Credit” which is where we fed in the student usernames. At this point, click the “Save and Provision…” button.


“Step 3: Disagregate and Push Data” is the last sheetSpider step we need. Make sure your settings are “Manual Push” and “Append only new unique records.” The uniqueness criterion can be both “Start Date” and “Media Credit” to ensure uniqueness. Running Step 3 will create the satellite sheets. You will need to publish those sheets for the timelines to work.


Now lets connect the timelines.  Open the “SpiderSheetEntities” tab and insert two columns to the right of Column F. Name these “Timeline Embed” and “Timeline Link.”  Then, add one column to the right of “J” and name it “Spreadsheet Key.”


Paste the following function into K2:


=ARRAYFORMULA(right (I2:I,23))


Paste the following function in G2:


= ARRAYFORMULA ( IF (A2:A = "", "" , "<iframe src='http://cdn.knightlab.com/libs/timeline/latest/embed/index.html?source=" & K2:K & "#gid&font=Bevan-PotanoSans&maptype=toner&lang=en&height=350' width='100%' height='350' frameborder='0'></iframe>"))


Then, paste the following function in H2:


= ARRAYFORMULA ( IF (A2:A = "", "" , "http://cdn.knightlab.com/libs/timeline/latest/embed/index.html?source=" & J2:J & "&font=Bevan-PotanoSans&maptype=toner&lang=en&height=650"))

These last functions complete the project.  Student submitted exit tickets are aggregated to personal spreadsheets, and once the spreadsheets are published, they are used to create embeddable timelines. The embed code works great but not in a Google Site. Use the "Timeline Link" and the iframe gadget if you are using a Google Site. Let me know if you use the project or make it better!

Wednesday, September 3, 2014

6 Day Cycles & Google Calendar Reboot


It’s schedule time again! The problem is simple: many schools have schedules that follow an a-typical cycle, often using six days instead of five, and Google Calendar doesn’t have a mechanism for recurring events like this. This post cleans up the six day scheduler that I wrote about a year ago. This customized Google Sheet uses the New Visions for Public Schools script “formMule” to automatically create a custom schedule in Google Calendar for the year. My secretaries, nurses, and other support staff loved being able to use Google calendar to easily find any class in the school. This post will provide step by step instructions to make it your own.
.
Start by making a copy of the 6 day scheduler. Click on the 6 Day Cycle tab and adjust the schedule to fit your system. This sheet is currently formated for the 2014-2015 school year. The Weekday, Six Day Cycle, and Month columns are easily built with functions, but I use a different sheet to calculate these values and then import them using the pushData script. It’s good to use direct values here; there are a lot of dates and all those functions slow down the sheet. Adjust the "Six Day Cycle" column If your schools uses something different. There's no reason you can't have a four day cycle!
.
Next, click the faculty tab and update accordingly. The email column is optional and only needs to be used if you want to invite teachers to the events in the schedule. I skip it because this leads to lots of email all at once. I don’t want to spam my teachers!
..
Click on the sheet named “Teacher Schedule.” The scheduler currently accommodates up to 9 periods in each day. Please note that you don't need to use all the periods - the sheet will only create events where the "Description" column is used. Customize the “Start Time” and “End Time” columns to reflect the time slots for your school. The Description column is used to name the events in your calendar. As mentioned before, events that have values in the "Description" column will be created in the Google calendar. These cells are validated from column A in the Faculty List Sheet. Using the validated values (the down pointing arrow on the right side of the cell.) saves lots of time in the long run.
.
I’ve packaged the formMule script with this sheet, so it should come installed when you make your copy. I’ve also included installation instructions below If something goes wrong with the package. The instructions are at the end of the post
.
Things I’ve learned:

This project evolved from a lab sign up Google sheet. The sheet was used successfully by teachers all last year to sign up for labs and carts. Appointments were automatically added to a shared calendar. It mostly worked as planned, but teachers found using the sheet to sign up for lab time awkward. More troublesome, teachers had difficulty deleting and updating events. Scheduling frustration never helps anyone, so I’ve decided to forgo the Google sheet for teacher sign ups and give Appointment Slots a chance. It will be a pain to set up but I think it will be a lot easier for teachers. The six day scheduler, on the other hand, has worked great!
.
formMule Installation
Install formMule from the script gallery (Tools -> Script Gallery.) Click the formMule menu that is now available, run the initial installation, authorize the script and accept the terms. Click the formMule menu again and select “Step One: Define Merge Source Settings.” Set the Merge source to be “Master Schedule” and click “Save Settings.”
.
.
.

Click the formMule menu again and select “Step 2b: Set Up Calendar Merge.” Click the checkbox next to “Turn on calendar-event merge feature.” Under “Create Event Condition” set the drop down box to “Description.” Type “NOT NULL” in the field to the right of “Description.” Set “Event Title” to ${"Description"}, if this is for a particular calendar, Art, for example, I will add “(art)” after ${"Description"}. Set “Start Time” to ${"Start Date Time"}, and “End Time” to ${"End Date Time"}. Click “Save Calendar Settings” at the bottom of the window.
.
.

.
Go back to the formMule menu and click “Preview and perform manual merge.” Look at the “Event Create” tab and make sure that the values are correct. Click “Run Merge Now” on the bottom of the window if everything looks right.
.
A year-long schedule can have thousands of events and a single merge might not complete the year. I add a time based trigger and set it to fire every hour. The complete schedule will be added to the calendar in less than a day!
.


Friday, July 11, 2014

Using FormMule and IFTTT for a moderated student twitter feed.


This project has been updated to use the new Google Sheets and formMule add-on, read about it here
Just about a year ago, I had the pleasure of camping with +Jasper Fox. We talked about Twitter in the classroom as we sat around the fire.  As usual, the conversation was great, we strategized about a Google form that a would allow students to compose tweets and the teacher to moderate them directly to Twitter. It took me a year to realize this simple workflow, but I think my teachers will love it in September. It’s purposeful, student centered, helps to reinforce digital citizenship, has an authentic audience, and promotes a positive home/school connection: win, win, win, win, and win.


This recipe has five components:
  • A simple Google Form linked to an “old” spreadsheet
  • The FormMule Script from New Visions for Public Schools (thus the “old” spreadsheet)
  • A Gmail account created specifically for this process
  • An If This Then That recipe
  • A classroom Twitter account


First, create a simple Google form with a one paragraph text question for the exit ticket. This PDF from Classroomfreebies was the inspiration. I used data validation to set the maximum character count of the question to 140. Then unlink the form from the original spreadsheet, create a copy of this “old” spreadsheet, and relink the form to the new copy.


Then, add a column labeled “Moderated” to the responses sheet and install the New Visions FormMule script. After initializing the script, proceed to step 2A and set FormMule to fire an email when the moderated column equals “1.”


After Initializing FormMule, you will see a new sheet titled Email1 Template.” Go to this sheet and set the “To” field to equal the gmail address where you want the moderated tweets sent. The “body” should equal the header of tweet column. You can copy  and paste the variables from the bottom of the sheet. For my example, the merge variable needs to be: “${"What would you like to tweet about today? "}”  The tweet is ready to be sent when a teacher puts a “1” in the “moderated” column. Now, all the teacher needs to do is “perform the merge” in the Form Mule menu and the moderated student exit tickets get emailed to the special gmail account.

Finally, set up an IFTTT recipe that forwards the body of any email sent to the gmail account to the class Twitter feed. This recipe was successful for me. And there you have it - a Google form that can collect exit tickets from your students, and tweet them to the class feed when you moderate them. Let me know if you make this better, or use it in your classroom!

Saturday, March 22, 2014

Creating a Google Form Powered File Sharing Site in Two Ways: Nose to Tail


This blog post has been sticking in my head over the last day and I decided to rewrite sections. The whole system that was used to create the Scarsdale Teacher Share is complex, and while it works for us, it isn’t for everyone. There is a lot to be said for simplicity and I’d like to include a less complex alternative that accomplishes a lot of the same stuff.  In the revised post below, I’ll explain the easier method first and then continue to the more complex version. The whole thing is pretty long - but I hope it's useful.


A couple of weeks ago I had the honor of presenting at the NY/NJ Google Summit.  Lisa Thuman does an amazing job putting the event together and I’m always impressed at the caliber of presenters and participants.  This year I presented on the Google script powered teacher sharing site that I’ve blogged about before. I promised the good folks in my session (thank you all for coming!) that I would write something to outline the system; this is that post. I meant to get it out sooner, but in the immortal words of John Lennon, “Life is what happens to you while you're busy making other plans.”


        This process allows a district to create a Google Form powered Google Site. A teacher can submit a file to share, organize it with self selected or generated tags. The simpler method uses a special gadget to interface with the form submissions and the shared resources.  The more complex example creates Google Site pages created automatically using the information given by the form.  For the complex example, I created a set of simple demo files that you can use here. The files that run the Scarsdale site are more complicated, but all of the basic functionality can be found in these demo files.


      With either method you must create a spreadsheet using the old sheets and build a form. Decide whether the system will work with a domain or be public.  For our district sharing site, the form is limited to the domain. Your spreadsheet needs to collect at least six things:

  1. Name of the contributor (Text question or automatic in a domain-only form)
  2. Email of the contributor (Text question or automatic in a domain-only form)
  3. Name of the resource (Text question)
  4. A description of the resource being shared (Paragraph text question)
  5. A field for tags (Text question with an “other” option)
  6. The URL of the drive resource that is being shared (Paragraph text question)


Once your form is in place, return to your spreadsheet and install the New Visions Form Folio Script. You will have to determine whether you are collecting usernames at this stage. You will also need to determine whether shared resources are copied and how they will be organized by formFolio.  The demo example uses the “Keyword” column to organize resources. A folder is then created for each keyword.  Scarsdale collects usernames in our domain-only share.  These usernames become our method for organization. We also copy the shared resources so that resources are stable despite faculty changes.


After you install formFolio, add the following sheets to the document:
  • formRanger List
  • csv horz array
  • HTML
  • buildPages (not needed in the simple method)
  • createPages (not needed in the simple method)
  • Awesome Tables (optional in the complex method, but you’d be crazy not to)


The “formRanger List” and “csv horz array” use the dynamic tagging system I described in a previous post.


The Simple Method: formFolio & Awesome Tables


The basic components for a teacher share are in place once you have your form and have installed formFolio.  Next, let’s create the interface for the shared resources using the Awesome Tables gadget.  Create a query on A3 of the Awesome Tables sheet. Use the query to grab the form submission data that you want to use in your interface. In the example below, I query the “createPages” sheet because the example showcases the complex method.


=QUERY (createPages!B2:J, "SELECT D, E, F, G, H, J", 0)


Then, use the first row to title the columns. These titles will be used in the interface. The second row corresponds to how the columns can be filtered by the end user.  Use the “Awesome Table” documentation to set this up. The spreadsheet has to be public in order for Awesome Tables to work.  If you don’t want to make your whole spreadsheet public, use two additional Google sheets, along with the New Visions script pushData to move the Awesome Tables page to a public sheet.
The final step in the simple version is to add the awesome table gadget to a Google Site page.  This is also explained in the “Awesome Table” documentation.  You can get creative with how the filters behave in the awesome tables sheet and a lot an depend on the data you’ve collected in the submission form.


The Complex  Method: formFolio & Google Site Page Creation

Let’s return to the complex method if you’re up for it. We need to look first at the “csv horz array” page. In the sharing site example, you’ll notice two differences from the dynamic tagging system I described in a previous post. Column A on the “csv horz array” page is named “Key.” This column combines the submission date and username to create a unique value to use on other sheets for vertical lookup formulas. Column B is named “HTML” and uses an if/then array formula to check whether tags have been assigned to a new resource.  If a tag cell is blank (column F and beyond) the formula uses canned HTML from the “HTML” page. If the tag cell contains a keyword, it is made into an HTML link that searches the site for that keyword, also using the “HTML” page as a reference form the code.


= ARRAYFORMULA ( IF ( F2:F2 = "" , HTML!A10 ,HTML!A7 & F2:F & HTML!A8 & F2:F  & HTML!A10 & (IF ( G2:G = "" , "" , HTML!B7 & G2:G & HTML!A8 & G2:G  & HTML!A10 ) & ( IF ( H2:H = "" , "" , HTML!B7 & H2:H & HTML!A8 & H2:H  & HTML!A10) & ( IF ( I2:I = "" , "" , HTML!B7 & I2:I & HTML!A8 & I2:I  & HTML!A10) & ( IF ( J2:J = "" , "" , HTML!B7 & J2:J & HTML!A8 & J2:J  & HTML!A10 ) ) ) ) ) ) )


This if/then strategy, combined with the HTML page, can be used creatively to build variety into your google site page based on user submissions.  Remember to install formRanger in order to connect the script as described earlier to make your form dynamic.


Next we turn to the “buildPages” sheet. The first column is another "Key" column. Just as on the “csv horz array” page, the “Key” column combines the timestamp and username field.


= ARRAYFORMULA ( B2:B &C2:C )
In cell B2 we use a simple arrayformula to copy over the form responses and formFolio columns without including the headers.  


=ARRAYFORMULA ( 'Form Responses 1'!A2:K )


The column headers are manually named in the first row to keep them friendly for the createPage script that we will discuss in a bit - form response headers have a habit of being a bit long. In column M we will add use a "LEN" function to count the Drive ID column that is created by the formFOlio script.  This returns a number when a resource is added to our share folder.
=ARRAYFORMULA ( LEN ( L2:L ) )


Column N uses an arrayFormula with a VLOOKUP that references the “Key” column. For a simpler method, you can install the copyDown script and forgo the arrayformula altogether.


=ArrayFormula ( IFERROR ( VLOOKUP( A2:A ;'csv horz array'!A$2:B  ; {2} * SIGN ( ROW ( B2:B ) ) ; FALSE ) ) )


Now lets move to the createPages sheet. The first two columns on the "createPages" sheet need to be "ID" and "Product Page." These will be used by the createPages script later on. Cell C1 will use a Query formula to pull the data from the buildPages sheet. Using this query we can reorder the columns and specify a query condition. We will use the LEN column that we added to the buildPages sheet to validate the query.


=QUERY (buildPages!A1:N, "SELECT A, B, C, H, E, J, N where M > 1", 1)


Now you can create the HTML for your Google Site page template. Take a look at the HMTL sheet. You will notice that I divided the HTML with yellow cells.  These cells correspond to the variables that are fed from the Google form.


Finally, we need to add the createPages script.  This essentially uses a script from the book “Google Script: Enterprise Application Essentials” The book is dated now, but you can still pull good ideas from the text.  If you investigate the Script Editor on the demo sheet, you will see that the script builds HTML pages on the Google Site using my code. Whenever a variable is called, the script references the columns of the createPages sheet.

This completes the more complex custom Google Site file repository, powered by a Google form.  To round out your site, you could create an interface with Romain Vialard’s aptly named “Awesome Tables” gadget, or simply set your navigation to auto generate.  A big thanks to New Visions for Public Schools for their amazing script library.