Sunday, May 31, 2015

Student Articulation Lessons Learned


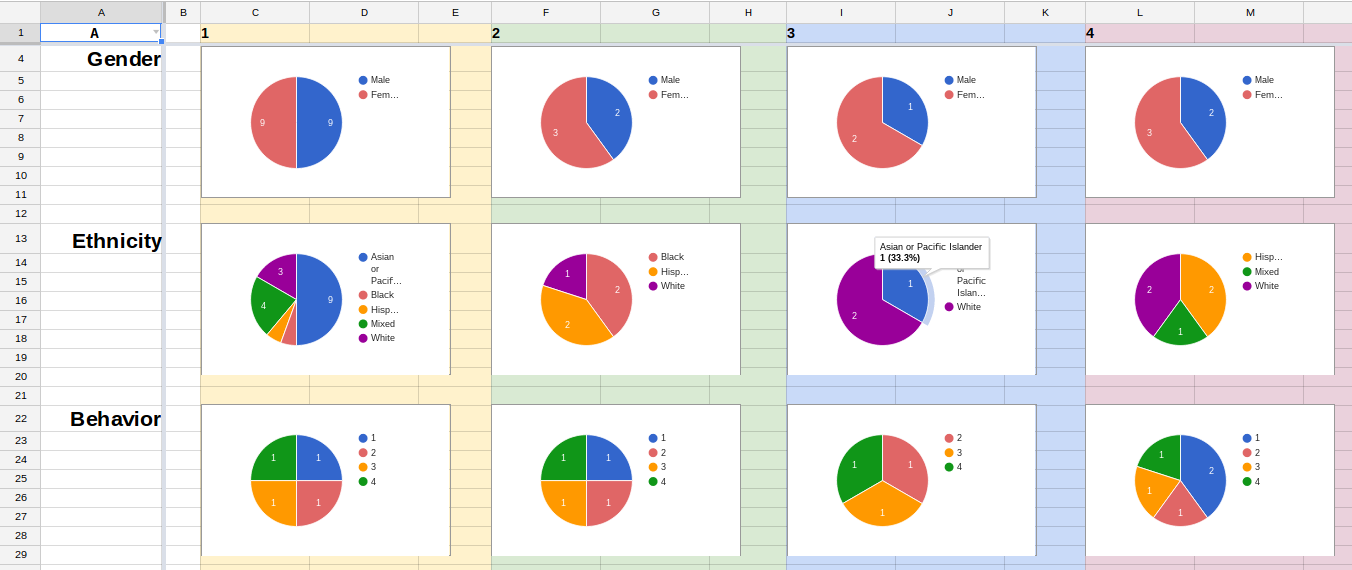
We are halfway through our student articulation meetings using the new articulator sheet that uses imported data from the STAR RTI screener. Some elements are going well. Being able to change the data visualizations using drop down menus has been amazing. The graphs and charts are hugely useful. The new system is less subjective, more visual, and has cut our articulation meetings down by a third. There are also several things that need to be made better for next year. This post will serve as a reflection that will hopefully inform (remind) my 2016 revision.


Behavior
Behavior is a subjective measure, but one that is crucial to consider for creating balanced classes. The system currently uses one metric for behavior. As we discuss students it is clear that this isn’t dimensional enough. Next year the system will include a metric for Social Skills and another for Attention to Task. These are both under the umbrella of behavior but mean something different for the chemistry of a classroom.


Link ALL Data to Student ID
Student information (Name, Birthday, gender, ethnicity, ect.) is currently pulled from the STAR reading data. The thinking behind this was ease of use: only two data imports were necessary (math and reading) to articulate the whole school and vertical lookups handle data using the student ID number after that. My method is flawed. Teachers use the “Data Beta” sheet to perform the initial placement and to add subjective scores like behavior and notes. The teacher added information is purely positional to the STAR data. In other words, student X is on row 4, and the teacher added data is also on row 4. The teacher added information will no longer match up to the right students if anything happens to the sort or row placement on the reading sheet. In the next iteration I need to have teachers add their information directly to the STAR reading sheet or a third data sheet that is only student demographics. The teacher added information needs to be anchored to the student ID number. This was lazy thinking on my part. It hasn’t been an issue (except for the next paragraph) because I’ve been careful, but it makes me nervous and is just sloppy.


Cross-Browser Inconsistency
I've discovered that the sheet sorts differently when teachers use a different browser. This was quite a surprise. The all of the data is brought to the “Data Beta” sheet via Queries. I have to test this more and haven’t realized the exact reason, but it is clear that the students sort differently when the sheet is accessed with Firefox or Safari. This is an issue because of the previous paragraph. I've told my teachers to only use Chrome when working with the articulation sheet which avoids any trouble. If I effectively anchor everything using the Student ID this won’t be an issue at all.

The process has been going really well and the sheet has been working. A few things have made the process clunkier than I’d like. Ironically, the biggest issue (not hard linking the teacher added information to Student IDs) was intended to make the setup easier. It was a “penny-wise and pound-foolish” decision. Even so, placement is going better than ever and the issues I've discussed here are fixable. The next iteration will be even better.

Tuesday, May 26, 2015

Open Thinking Pays Dividends


Screenshot 2015-05-26 at 12.20.56 AM.png

Last Wednesday I participated in a Google Educator Group Hangout with +James Peterson, +Jane Lofton and +Dan Imbimbo. It was meant to be an advanced sequel to the Google Edu on Air workshop about sheet powered Book Review Sites and it turned out to be much more. It was the kind of great conversation that keeps you up for a few nights while you work out what was discussed.


After the Hangout, James posted his hack of the advanced book review site and his thinking floored me. That evening I stayed up to 3 am incorporating his thinking into my own; I can truly say that the project is better and I am smarter as a result.

For background on the original book review site you can read this post or watch the Google Edu Hangout on Air. James took this site idea and brought it to another level:
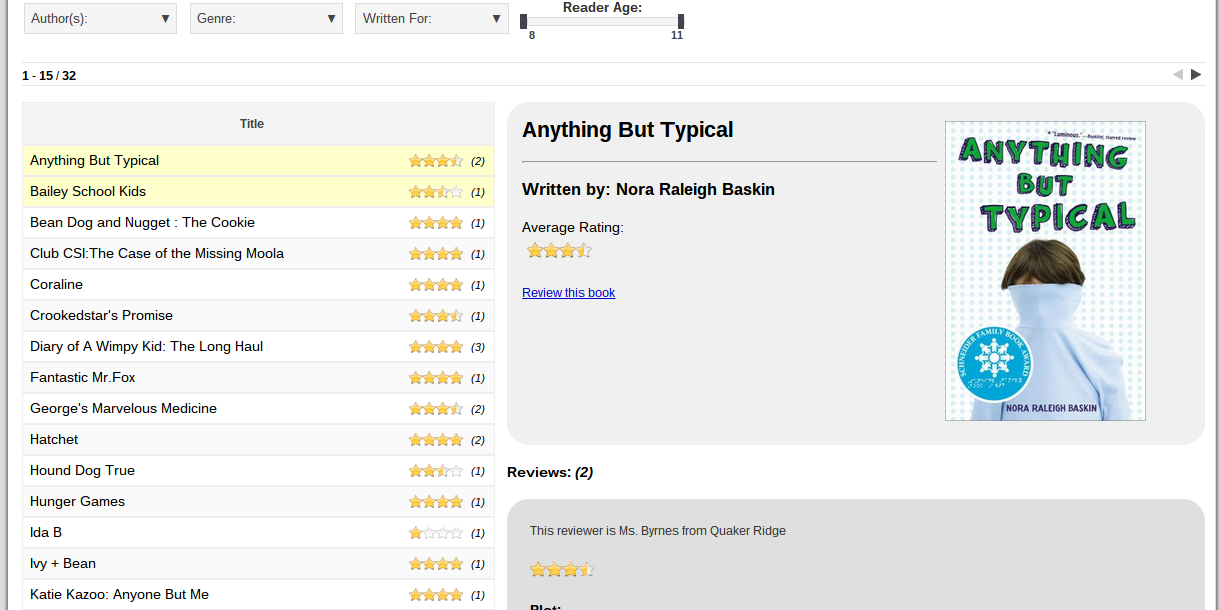
  • He used HTML in the Awesome Table list to include an average star rating next to each book title. which was such a smart way to provide feedback to users.
  • He figured out a way to build a sheets function with “join” and “filter” to combine multiple reviews of the same book into an HTML snippet.
  • He uncovered the templates feature of Awesome Tables which isn’t in the official documentation


James did a truly excellent job documenting these improvements on his blog.


James’ book review system is targeted to teachers, not students, and his design has different requirements as a result. I needed to incorporate his improvements into my system where posts are moderated and submission notifications are sent to teachers and librarians. My system also asks slightly more of the submitter, including a plot summary. In the near future I’ll write an explicit post about how I incorporated James’ system, but you are welcome to copy the demo sheet to pull it apart now. Full disclosure - there are a couple of clunky things I’d like to streamline, but it still works as advertised.

I’m so thankful for my PLN who is a daily source of inspiration and support. Every once in a while I’m shown how powerfully good this network can be. This was one of those times.

Tuesday, April 7, 2015

Student Articulation Using STAR Data and Google Sheets


It’s the time of year when we start to think about placing our elementary students into next year's classes. This project uses data from the Renaissance Learning STAR RTI screener to help build balanced classes using configurable and visual dashboards. If you use STAR assessments then this project is for you!
The project has a data loader where you can add the math and reading assessment sheets that are exported directly from STAR. You can customize the number of students in your school, the teachers, and the grade level that you are articulating on the “Variables” sheet. This demo has been loaded with fake data, created using Mockaroo (I love that site!)
Once the student data is loaded, teachers can perform an initial placement of the students in their class. There is an option to place students in two different class arrangements, just in case a current grade is close to splitting or contracting. Once students have been initially placed, the articulation team can meet to refine the placement using the different data dashboards.


Each dashboard is configurable using drop down menus. The “Roster” dashboard lists students who are selected for each class and allows the articulation team to compare three metrics at the same time from a menu of twenty-four. The “Charts” dashboard shows a visual representation for each class and the “In Focus” dashboard details any one class, including the “Do not place with…” information. Each dashboard can instantly toggle between class configurations, just in case teachers need to plan for a potential split or contraction.
The project has an instructions page for teachers and administrators to help set up the system. It is definitely the best articulator yet, built from what was learned after using the previous iterations. I hope other systems, probably those that also use STAR assessments, find this useful. If you are able to use this project, let me know in the comments!

Sunday, March 1, 2015

The Elusive Google Site Twitter Feed Found!


I love Google Sites, I really do. I encourage my teachers to use it for their class sites by expounding how great it connects with Google Drive. My pitch falls short when the teacher tries to embed her class Twitter feed and discovers that Sites doesn’t play nice. Never fear, all you have to do is create a custom Twitter gadget for Sites - and it isn’t even hard.


What you need to make your custom Twitter gadget for Sites:
  • A simple text editor.  On my Mac I’ll use TextEdit. For Windows you can use Notepad.
  • A Google Site with “Attachments” turned on
  • A Twitter feed or list that you want to add to your site
  • The HTML for your feed gadget


Create Your XML File
Lets start by creating a gadget XML file and open a new document in your simple text editor. You don’t want any formatting, so the simpler the editor, the better. (edit: Since I originally wrote this post it's clear from the comments that some have run into problems with their text editors. The file that you save must be a raw text file and lots of desktop editors don't do this without some fiddling. I recommend using the Chrome App "Text." It's free, it's cross platform, and it works great.) This XML file will be the delivery mechanism for your Twitter gadget. Copy and paste the following code into the new text file:

<?xml version="1.0" encoding="UTF-8" ?> <Module> <ModulePrefs title="Twitter Timeline"/> <Content type="html"> <![CDATA[

//Twitter feed goes here

]]> </Content> </Module>

Then save this file as “twitterFeed.xml.”


Get your Twitter Gadget HTML
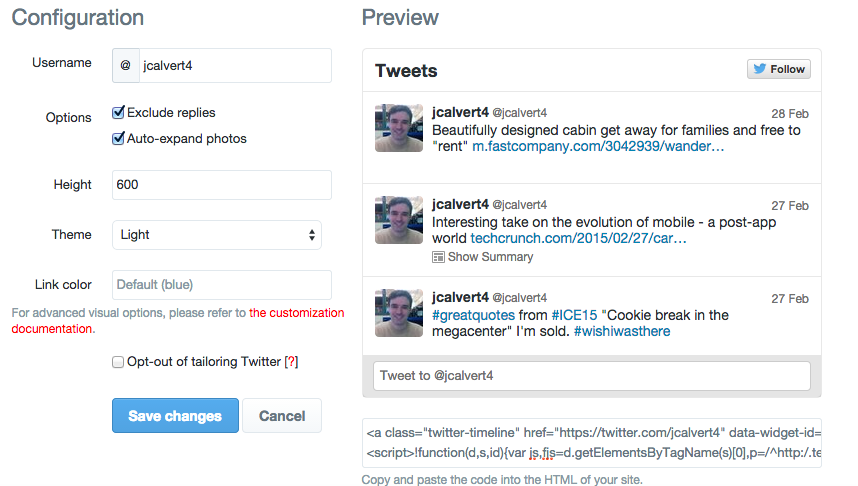
Now you are ready for your Twitter feed. Log into Twitter and click on your avatar at the top right of the screen to access the setting menu, then click “Settings.” Once in the Settings window, click the last item in the left sidebar, titled “Widgets.”  Then, click the “Create New” button on the top right.


Screen Shot 2015-03-01 at 1.24.14 PM.png


The “New Widget” screen gives you lots of control over how your gadget will work. Customize your gadget and click “Create Widget.” Then, copy the code on the bottom right. Return to the XML file that you created earlier and replace the text “//Twitter script will go here” with the feed code you got from Twitter. Now save the XML file.


Host Your Gadget
Hosting your new XML file is simple, all you need is a public Google Site. I’d recommend using the site where you are adding the Twitter Gadget. Scroll to the bottom of the Sites page look for the link to “Add files.” If this can’t be found you need to either turn on attachments (Settings > Page Settings) or sign into the Google Site.


Click “Add files” and attach your new XML file. Then, right-click, or command-click, the download icon to the right of the file and select “Copy link address.”


Add Your Gadget to Sites
Edit the page where you want the Twitter feed and click “Insert.” After this, click “More Gadgets.” Finally, click “Add Gadget by URL” and paste in the Twitter gadget XML link. Once you press the “Add” button you’re done: you’ve successfully created a Google Gadget for Twitter!

Sunday, February 15, 2015

Finally, Google Docs Speech Recognition


I’ve been looking for a free speech recognition tool to use with Google Docs since the unveiling of Chrome extensions. The time has finally come with the Docs Add-on “Speech Recognition.” I’ve used the tool with several 8 and 9 year old students and have found it easy to operate and remarkably accurate.


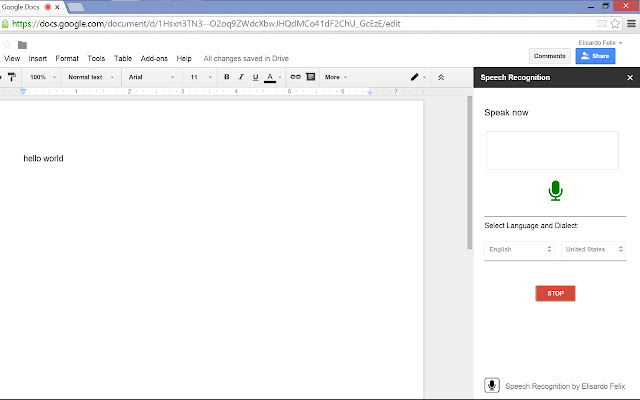
Speech Recognition appears in the Add-on menu after being installed from the Gallery.  Once started, a speech recognition sidebar opens that allows the user to specify the language being spoken. In addition to handling English well, I’ve heard from my World Language colleagues that the Spanish recognition is quite good. The Add-on begins to work with the click of a start button and stops by using the same button. Punctuation is included when the user verbally declares where it should be (edit: some folks have reported that punctuation is a weakness, see the comments...)


Accuracy has often been a challenge for speech recognition tools that aren’t trained to understand the speaker, such as the capable Dragon Naturally Speaking. Accuracy is also a challenge when the speaker has a young voice or doesn’t project well. I found neither to be the case with this add-on.  One soft-spoken young lady was having trouble typing the non-fiction book that she was working on. She was able to clear through three chapters after using “Speech Recognition.”


Students often do not verbalize the punctuation, so it is necessary for them to reread and make edits where necessary. Mumbling can also be misunderstood. I actually consider both of these deficits a feature and enjoyed watching our young writers reread their work and revise.

At the risk of being hyper-critical, I would love to see this add-on utilize keyboard shortcuts. I do not know what kind of technical challenge that presents, but it would be highly beneficial for users who have trouble manipulating a mouse. So far, this is my only criticism of this capable and user-friendly tool.

This has been cross-posted at the Chrome Toolbox.

Sunday, February 8, 2015

A Rebuild of the Moderated Twitter Form


A few months ago I blogged about a system that would allow students to tweet to a class Twitter feed after teacher moderation. Since that post, the good folks at the +New Visions for Public Schools Cloud Lab rebuilt Form Mule (an important component in the system) to work in the new Google Sheets. This post will explain how to build the Twitter Moderator system using the New Sheets, which I highly recommend you use. A few teachers asked for a video tutorial. I like a tutorial that I can read so I created both. I hope it's helpful!


This recipe has five components:
  • A simple Google Form linked to a Google spreadsheet
  • The FormMule Addon from New Visions for Public Schools
  • A Gmail account created specifically for this process
  • An If This Then That recipe
  • A classroom Twitter account


First, create a simple Google form with a paragraph text question for the exit ticket. This PDF from Classroomfreebies was the inspiration. I used data validation to set the maximum character count of the question to 140 (this is a simple but important step.) Click “Require [Your Domain] to view this form” and “Automatically collect respondents username” if you are using this with students. Now, click “view responses” at the top of the form edit window to open the Spreadsheet attached to the form.


Then, add a column labeled “Moderated” to the responses sheet and install the New Visions FormMule Addon. Click “addons” in the menu bar, then “formMule”, then “Launch.” Once launched, select the Form Responses sheet for the source of merge data. Then, activate the time based trigger switch and set the trigger to run every hour. Click “Next: Templates and Send Conditions.”


We are only going to be sending one type of email. Change the send condition to point to the “Moderated” column. I usually use “Not Null.” This means that anything typed in the “Moderated” column will send the corresponding tweet to your Twitter account. If you want to be more specific, use a command like “yes.” Then, click “Next: edit templates.”


The email template is very simple. Click into the “To:*” field and add the GMail address that you created for this project. Click into the “subject” field and set this as well. Personally, I like using the Timestamp as the subject. You may also want to use the username. Then click into the “body:” field and then click the “What would you like to tweet about today?” tag. Finally, click “Preview and send all.” The Google side of the system is now done! Now we need to set If This This Than That (IFTTT) to send moderated tweets to Twitter.


Log into IFTTT, your new GMail account, and your class Twitter feed. Return to IFTTT and open this recipe. Once you add the recipe you will need to connect IFTTT to the Twitter and GMail accounts. Once the recipe is activated, scroll down on the edit window to the trigger and set the address to be the same GMail account you used in formMule. Click “Update” and you are done!


There you have it - the updated Twitter moderation feed using the new Google Sheets and formMule Addon. As before, let me know if you use it in your classroom! If you think of a way to make it better, let me know about that, too!

Tuesday, January 27, 2015

Lessons Learned Through Art Bots


I’ve realized something funny about myself while on the #makered journey.  Normally, I’m a huge proponent of project based learning. I try to incorporate story lines and plan for open ended solutions. But I fell back on recipes when I started working with kids in the Makerspace last year. You know what I mean; everything comes with recipes - Legos, Snap Circuits, even Instructables.  A recipe gives students an outcome and then provides the steps to make the outcome happen. Although efficient, recipes rob students of creativity and the trial and error process that is so important to making enduring connections. This year I have been working hard to avoid the “recipe crutch” and the results have been much more rewarding.

Take the simple art bot, for example. Last year I scoured the Internet for different takes on the vibrating drawing robot and found one that looked simple and effective. I created a demonstration bot to use as a model and carefully planned how to explain the needed circuit.  The project went off without a hitch and each student created a reasonable facsimile of my art bot. Looking back, the project fell well short of what it could have been.

To be fair, I was just starting things off last year and had no materials to pull from. I hadn’t read Make Space and we didn’t have our T Walls yet. I hadn’t taken Lisa Yokana’s design thinking course and I wasn’t using the d.school’s design process as a framework. It’s important to respect the beginning of something. In the last year I have had many inspirations to move my teaching and the art bot project is different as a result.


As with each project this year, students started at the T walls - planning their designs together.  Then, students went “shopping” at the material wall to get what they needed to build their prototypes. The material wall would be revisited over and over again throughout the project as designs were modified. This is the first bit of advice I would give to a teacher trying to set up a Makerspace: before you get the fancy and expensive hardware, get lots of inexpensive materials (popsicle sticks, foam shapes, paper clips, beads of different sizes and shapes - get as much as you can) and organize them in easy to open containers. Then display these materials in an open and accessible way. Don’t hide them behind a cabinet. With my material wall as a resource, I could introduce the idea of an artbot, discuss the circuit using the motor and battery, and challenge the students to come up with a novel design that would accomplish the task. The results were amazing. Students came up with incredibly creative solutions, some of which were far better than the recipe I had used last year.


I learned a few lessons through the Art Bot project. I needed to let go of the recipes and trust the design process. I needed to have inexpensive materials available for student prototyping. I needed to let the kids find their own path to the solution. In the end, the project was easier for me, involved much more critical thinking for the students, and was significantly more meaningful for everyone.