Showing posts with label Better Bureaucracy. Show all posts

Friday, April 19, 2019

Administrative Internship Experiences Log Using Google Sheets and Forms


I built this system for students in the Educational Leadership program at Long Island University. Students are required to complete an administrative internship where 450 hours must be applied to 50 administrative competencies. This process demands a fair amount of logging hours and record keeping. Fortunately, it’s the perfect use case for Google Sheets and Forms. You may have found yourself to this post because you are an LIU student, or you may be looking for help creating your own logging system, either way, welcome. Be sure to leave a comment if you have any questions.


The system documented here allows students to use a Google form, from a computer or a mobile phone, to log competencies completed, time, and record detail. Once submitted, the sheet groups experiences automatically by competency, the dates are recorded and the hours tabulated. Experiences aligned the LIU “Internship Rubric” are automatically added under the appropriate strand. The number of competencies and the hours earned  are tallied. The log and rubric can be printed and added to the portfolio once the target 450 hours and 50 competencies are complete.


How do I set it up?
  1. Rename the file by clicking on the name "Copy of LIU Hudson School of Education: Administrative Field Experiences Form 2" on the top left.
  2. Open your Form.
    Look at the Google Spreadsheets menu. Click the item "Form" and then select "Go to live form."
  3. Copy the web address of your Form.
  4. In the form that opens, select and copy the entire web address from the browser address bar.
  5. Navigate to the Log page.
    On the bottom of the spreadsheet are 4 pages, Directions, Log, Rubric, and Form Responses 1. Click on "Log."
  6. Paste the form web address into cell A3. It is the orange cell near the top left of the sheet.
  7. Type the name information at the top of the "Rubric" page. Click the "Rubric" page on the bottom of the sheet and fill out the appropriate information at the top. You do not need to edit the hours completed. This is automatic.


How do I use this?
Using the Field Experiences form is easy! You must add every experience you have using the form alone. This adds all of the information that you need in the way that the system understands. You can open the form directly from link that appears in cell A4 once you complete Step 6 above. You can bookmark the form link on your browser or open it directly on your phone. As you submit experiences via the form, the hours total updates automatically in cell C1 and the competencies total updates in E1 at the top of the "Logs" page.


Can I edit an experience after I submit the form?
Yes. But ONLY on the "Form Responses 1" page below. If you manually edit the form responses, please remember that the Competencies listed in column C must use the same words and punctuation as those listed on the "Log" page. I recommend that you copy and paste.


Can I change anything on the "Log" page?
Nope. This page updates automatically when you submit a form. It is designed to be printed so that you and your mentor can sign a paper copy. Use the Form Responses page if you want to edit a date or an event.


How about the Rubric page? Can I edit that?
Yes. The only thing that can't be edited are the experiences (in the grey boxes) that are listed under each strand. These come directly from the "Log" page. Everything else is designed to be directly edited or completed after the rubric is printed.


Sunday, October 14, 2018

Google Sheets Powered PO Generator


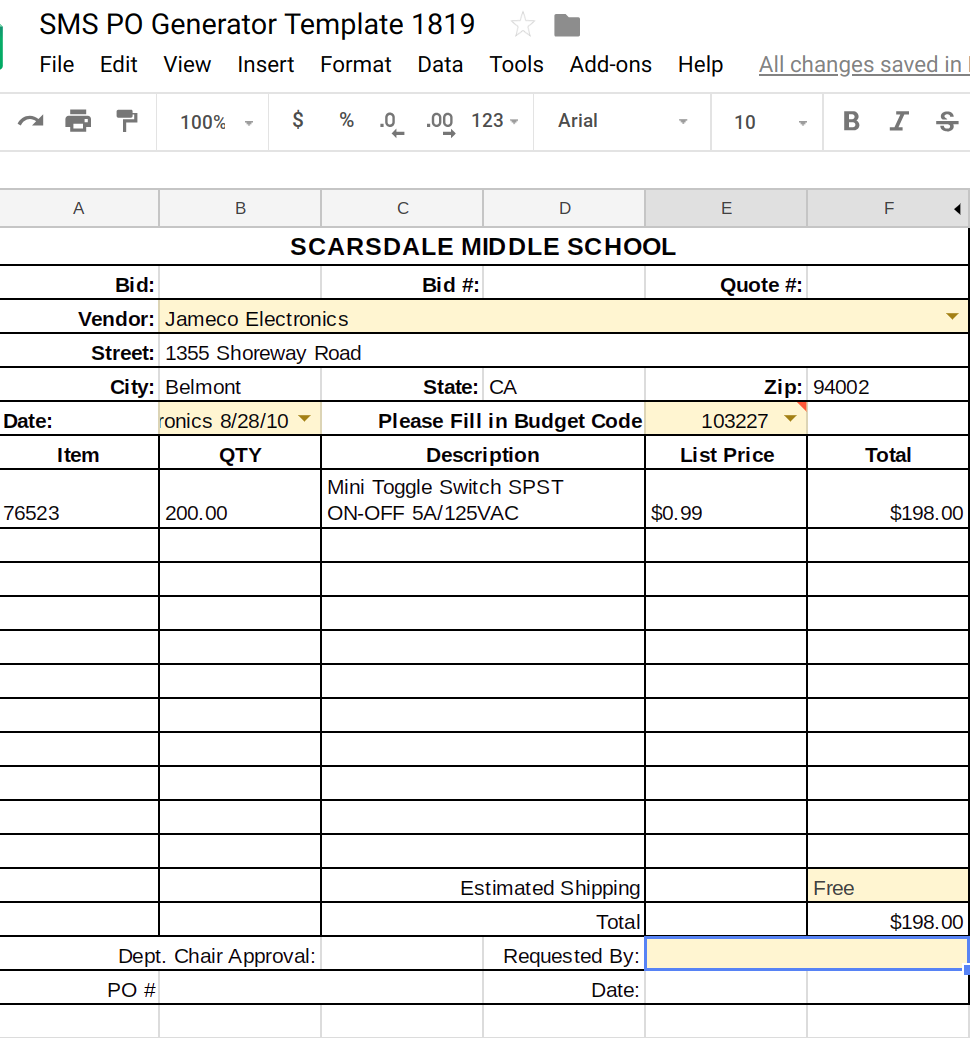
Writing purchase orders is one of the least favorite parts of my job. It’s often a repetitive and monotonous task that requires a deep dive into a file cabinet, a massive catalog, or both. I created this spreadsheet tool to make POs a little less onerous. This system keeps track of your orders, allows you to take notes, monitors your budget in different budget codes, and will actually generate the printed PO sheet! Make a copy if you would like to use the sheet. I hope you find this as useful as I do.

Setting up the sheet is easy. Just add your vendor information to the Vendor Tab. As a general rule, anything in the sheet with a yellow background can be edited. Anything with a grey or black should not be edited. These are controlled with functions. Adding vendor addresses is a one-time outlay of work. The address will auto-fill on the POs. I include my own information here, too, because there are certainly times when I purchase something from a vendor not on the bid list (Amazon, anyone?) and need to submit a PO with me as the vendor. You can add vendors as you need them, secure in the knowledge that the address will be ready the next time a PO is generated for that seller.

Also on the Vendor sheet is a budget code table. I have two budget codes as a technology teacher, one for supplies and another for equipment. In order to keep track of your codes, add the total amount you have to spend and the codes themselves in the appropriate columns (yellow only.) You’ll notice that the sheet automatically keeps track of the amount left in each budget code and the supplies code has a function that helps me keep track of per student expenditure.

The “Master Sheet” is where I fill out my orders (yellow cells only.) It's fairly self explanatory. One this thing I need to point out: the first two columns seem redundant but are not! The first column allows me to specify an order on a specific day, the second column is only the vendor name, linked to your vendor sheet. This second column controls the address information and is independent of the date. Both are necessary!

Once your order is recorded on the “Master Sheet” you can generate your PO. Now you have one place for all your PO records and you don’t have to worry about handwriting a PO form. Better yet, next year I have a clear record and can reorder easily. Open the PO Generator tab. You will notice four yellow cells, three with drop down boxes. Select your Vendor, which will populate all of the address fields. Then, select the date the PO was written, which is fed from the first column of the “Master Sheet.” Finally, select the budget code, write in the potential shipping cost, and add your name in the “Requested by:” field.

Your PO Is ready to print! This has made PO writing so much easier for me. I keep notes on my Master Sheet, such as when an order arrives, or if I was unhappy with the product. My record keeping is better and the process is a lot faster. This was designed using the Scarsdale PO form, so you may need to redesign the PO Generator layout. Let me know if you use this and if you’ve made it better!