Sunday, February 15, 2015

Finally, Google Docs Speech Recognition


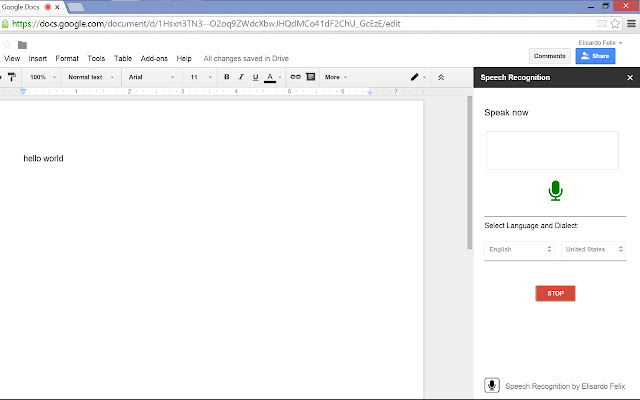
I’ve been looking for a free speech recognition tool to use with Google Docs since the unveiling of Chrome extensions. The time has finally come with the Docs Add-on “Speech Recognition.” I’ve used the tool with several 8 and 9 year old students and have found it easy to operate and remarkably accurate.


Speech Recognition appears in the Add-on menu after being installed from the Gallery.  Once started, a speech recognition sidebar opens that allows the user to specify the language being spoken. In addition to handling English well, I’ve heard from my World Language colleagues that the Spanish recognition is quite good. The Add-on begins to work with the click of a start button and stops by using the same button. Punctuation is included when the user verbally declares where it should be (edit: some folks have reported that punctuation is a weakness, see the comments...)


Accuracy has often been a challenge for speech recognition tools that aren’t trained to understand the speaker, such as the capable Dragon Naturally Speaking. Accuracy is also a challenge when the speaker has a young voice or doesn’t project well. I found neither to be the case with this add-on.  One soft-spoken young lady was having trouble typing the non-fiction book that she was working on. She was able to clear through three chapters after using “Speech Recognition.”


Students often do not verbalize the punctuation, so it is necessary for them to reread and make edits where necessary. Mumbling can also be misunderstood. I actually consider both of these deficits a feature and enjoyed watching our young writers reread their work and revise.

At the risk of being hyper-critical, I would love to see this add-on utilize keyboard shortcuts. I do not know what kind of technical challenge that presents, but it would be highly beneficial for users who have trouble manipulating a mouse. So far, this is my only criticism of this capable and user-friendly tool.

This has been cross-posted at the Chrome Toolbox.

Sunday, February 8, 2015

A Rebuild of the Moderated Twitter Form


A few months ago I blogged about a system that would allow students to tweet to a class Twitter feed after teacher moderation. Since that post, the good folks at the +New Visions for Public Schools Cloud Lab rebuilt Form Mule (an important component in the system) to work in the new Google Sheets. This post will explain how to build the Twitter Moderator system using the New Sheets, which I highly recommend you use. A few teachers asked for a video tutorial. I like a tutorial that I can read so I created both. I hope it's helpful!


This recipe has five components:
  • A simple Google Form linked to a Google spreadsheet
  • The FormMule Addon from New Visions for Public Schools
  • A Gmail account created specifically for this process
  • An If This Then That recipe
  • A classroom Twitter account


First, create a simple Google form with a paragraph text question for the exit ticket. This PDF from Classroomfreebies was the inspiration. I used data validation to set the maximum character count of the question to 140 (this is a simple but important step.) Click “Require [Your Domain] to view this form” and “Automatically collect respondents username” if you are using this with students. Now, click “view responses” at the top of the form edit window to open the Spreadsheet attached to the form.


Then, add a column labeled “Moderated” to the responses sheet and install the New Visions FormMule Addon. Click “addons” in the menu bar, then “formMule”, then “Launch.” Once launched, select the Form Responses sheet for the source of merge data. Then, activate the time based trigger switch and set the trigger to run every hour. Click “Next: Templates and Send Conditions.”


We are only going to be sending one type of email. Change the send condition to point to the “Moderated” column. I usually use “Not Null.” This means that anything typed in the “Moderated” column will send the corresponding tweet to your Twitter account. If you want to be more specific, use a command like “yes.” Then, click “Next: edit templates.”


The email template is very simple. Click into the “To:*” field and add the GMail address that you created for this project. Click into the “subject” field and set this as well. Personally, I like using the Timestamp as the subject. You may also want to use the username. Then click into the “body:” field and then click the “What would you like to tweet about today?” tag. Finally, click “Preview and send all.” The Google side of the system is now done! Now we need to set If This This Than That (IFTTT) to send moderated tweets to Twitter.


Log into IFTTT, your new GMail account, and your class Twitter feed. Return to IFTTT and open this recipe. Once you add the recipe you will need to connect IFTTT to the Twitter and GMail accounts. Once the recipe is activated, scroll down on the edit window to the trigger and set the address to be the same GMail account you used in formMule. Click “Update” and you are done!


There you have it - the updated Twitter moderation feed using the new Google Sheets and formMule Addon. As before, let me know if you use it in your classroom! If you think of a way to make it better, let me know about that, too!

Tuesday, January 27, 2015

Lessons Learned Through Art Bots


I’ve realized something funny about myself while on the #makered journey.  Normally, I’m a huge proponent of project based learning. I try to incorporate story lines and plan for open ended solutions. But I fell back on recipes when I started working with kids in the Makerspace last year. You know what I mean; everything comes with recipes - Legos, Snap Circuits, even Instructables.  A recipe gives students an outcome and then provides the steps to make the outcome happen. Although efficient, recipes rob students of creativity and the trial and error process that is so important to making enduring connections. This year I have been working hard to avoid the “recipe crutch” and the results have been much more rewarding.

Take the simple art bot, for example. Last year I scoured the Internet for different takes on the vibrating drawing robot and found one that looked simple and effective. I created a demonstration bot to use as a model and carefully planned how to explain the needed circuit.  The project went off without a hitch and each student created a reasonable facsimile of my art bot. Looking back, the project fell well short of what it could have been.

To be fair, I was just starting things off last year and had no materials to pull from. I hadn’t read Make Space and we didn’t have our T Walls yet. I hadn’t taken Lisa Yokana’s design thinking course and I wasn’t using the d.school’s design process as a framework. It’s important to respect the beginning of something. In the last year I have had many inspirations to move my teaching and the art bot project is different as a result.


As with each project this year, students started at the T walls - planning their designs together.  Then, students went “shopping” at the material wall to get what they needed to build their prototypes. The material wall would be revisited over and over again throughout the project as designs were modified. This is the first bit of advice I would give to a teacher trying to set up a Makerspace: before you get the fancy and expensive hardware, get lots of inexpensive materials (popsicle sticks, foam shapes, paper clips, beads of different sizes and shapes - get as much as you can) and organize them in easy to open containers. Then display these materials in an open and accessible way. Don’t hide them behind a cabinet. With my material wall as a resource, I could introduce the idea of an artbot, discuss the circuit using the motor and battery, and challenge the students to come up with a novel design that would accomplish the task. The results were amazing. Students came up with incredibly creative solutions, some of which were far better than the recipe I had used last year.


I learned a few lessons through the Art Bot project. I needed to let go of the recipes and trust the design process. I needed to have inexpensive materials available for student prototyping. I needed to let the kids find their own path to the solution. In the end, the project was easier for me, involved much more critical thinking for the students, and was significantly more meaningful for everyone.

Sunday, November 23, 2014

Redefining the Bird House, Part 2

The second grade students learned more than I expected in our "Redefining the Birdhouse" challenge. Beyond making cool birdhouses, they might be able to help Congress...


Mrs. Cheung’s second grade students had spent several days brainstorming their redesigned bird habitats and now it was time to start making.  These students are familiar with using materials like Legos to build - but this project was different.  They needed to realize a three dimensional birdhouse from 2 sheets of 18 inch square cardboard. We wanted to ease the class into three-dimensional thinking and how better to do that than with Minecraft?


Three-dimensional thinking
Building in three dimensions from two dimensional sheet material isn’t intuitive - we imagined confused stares and the chorus of, “What do we do now?”  We started by printing out Minecraft blocks from PixelPaperCraft.com using card stock. Cutting, folding, and gluing a 3-D cube is challenging but the children were able to persevere because, well, Minecraft is cool. We modeled cutting and folding the paper and had a sample cube available (without adhesive) so that students could see how it turns out. Although students used glue sticks to hold the cube together, I’d recommend having some scotch tape on hand, you’ll thank me later. It took a cognitive leap for the class to turn the paper into a cube, and I’m glad we started that way.


Planning
Cube building was an important step to prime our students for three dimensional thinking. Once primed, students reconvened into teams to plan how to change their cardboard sheets into 3-D bird houses. The children used small whiteboards and dry erase markers to sketch out where they should cut and fold the cardboard. Whiteboards have a playful, impermanent feel and the teams planned with enthusiasm. Teams needed to take turns planning on the small whiteboard and negotiate the direction for the birdhouse.


Building
It became clear that inter-group communication was valuable once students started building. Students used scissors, safety cutters (I highly recommend these for any elementary maker space!), and duct tape to construct their houses. Glue guns and the drill press (for bird house doors!) were available with teacher support. Each group was doing something interesting, but in isolation from the other cool things that were happening in other groups. We needed to reinforce that the teams were not in competition with one another, and could, in fact, help other teams. We needed to regularly stop the work and discuss what was going well and what wasn’t. Students were more self-assured after each discussion. Where teams needed to practice working together during the planning phase, now they needed to work together as a class. It was strangely foreign!


What I’d do differently next time
Next time I do this project I will try to build a better scaffold for empathy from the bird’s perspective. It is difficult for a seven year old to think from the perspective of another person, much less a bird. The kids did a great job but I think it could have been even better. I think it’s great that they figured out how to make furniture, I’m just not sure it fits into the design challenge. I’d also push harder on inter-team collaboration. I cannot stress enough how valuable it was to have the teams share with one another. Our students are used to competing with one another, both individually and in teams. It took a shift to think of the design challenge as a common goal that we could work on together to solve.

Why I think Congress should try design thinking
We live during a polarized time where people are more likely to talk over one another than to one another. The design thinking process encourages students to put themselves into someone else's shoes when they problem solve. The process enables teams to work together towards a common goal, rather than against each other. Lately it seems that the skills of negotiation, collaboration, and perspective sharing are rarely practiced. I'm encouraged that this generation could buck the trend.

Thursday, November 13, 2014

Student Book Review Database W/ formMule & formRanger

One of our teachers, +Shoshana Cooper, had a great idea during our summer Chromebook orientation day. She wanted to create a moderated book review site for students that was powered by a Google Form. This post is the result of that conversation.  With the help of +Andrew Stillman's add-ons and +Romain Vialard's Awesome Table, this project is able to do quite a lot. I’ll start by showing what it looks like, explain what the system actually does, and then explain how to use the demo files step by step.

How it looks


The book review site is based on Romain Vialard 's Awesome Table gadget. This aptly-named gadget creates a sortable list from a Google Sheet and looks really slick. I add the gadget and the review form to a stripped down Google Site and embed the site using an iframe on any teacher’s webpage.  This almost effortlessly enhances the web presence for the class site and increases teacher buy-in. The gadget and form can be added in the regular way if a teacher has a Google Site. This modularity is important and will allow us put the same form in multiple spots to power a book review database for each of the five elementary schools!


What it does
The form is set to record the user ID to keep submissions accountable (this has to be turned on if you copy the form, the demo files are in the wild and don’t have this option.) The system uses Andrew Stillman's formMule Add-On to email the classroom teacher and a designated point person for each building in a district (the point person in my building is our librarian.) The email includes a copy of the student’s review and a link to the moderation Google Sheet. The first column of the moderation sheet is the moderation column - adding a “1” moderates the review and adds it to the site. Each review can also be edited using the “Form Response” sheet before moderation.


The review keeps the child’s name concealed when a when a review is written, saying instead, “The reviewer is XX years old from XYZ building.” When a teacher reviews a book, the review declares the teacher’s name. Each review has those cool graphic stars indicating the rating and can also display the book cover. The book cover is optional and requires the moderator to add a link on the moderation site to the cover graphic. To make this easier, the moderation sheet automagically links to the book’s page on Librarything. The moderator can visit the link and copy/paste the book cover image URL.


Students can also recommend a book for a type or reader (such as Kids who like scary stories, etc.) The “Type of reader” list on the form is updated via another Andrew Stillman gift, the formRanger Add-On. When a student comes up with a new type of reader it is automatically added to the form.  More on that later.


How to set it up
Don’t let all the stuff going on in this project dissuade you from trying it yourself, the complicated parts are taken care of by the add-ons and functions prepared in the sheet.  What is left to do is list the variables unique to your school, install the add-ons, and add the interface to your website. Lets find out how.


Add the variables
Copy the Moderation Google Sheet and Form. The sheet is already prepared with protected ranges on the moderation page to keep teachers from accidentally deleting formulas.  All of the variables for the form (teacher names, buildings, emails, etc.) are controlled from the “fromRanger” sheet. Navigate to this sheet and add the teachers, teacher emails, and buildings for the participating classes (delete the demo names first!)


In addition to the classroom teacher, each building has a point person to help moderate reviews. The point person in my building is our librarian. Determine who the the point person is for each building and update the emails in the “Point person for moderation” column. Finally, add any genres that you wish to include on the form. Hold off on the “Who would like this book” column, we’ll get to that is a bit.


How to install the add-ons
Installing and configuring add-ons is a little easier than working with scripts on the old Google sheets. We are going to install two add-ons to make this project work: formMule and formRanger. We will install and configure formRanger first.


formRanger
FormRanger is a form add-on and requires you install from the form. Navigate to the “Edit Form” window (from the spreadsheet Form > Edit Form) and click on Add-ons > Get Add-ons. Search for “formRanger” by New Visions Cloud Lab and install. Now formRanger will appear when you click the “Add-ons” menu item. Do this and click “Start.”


The formRanger sidebar will display when you click “Start” and every question on the form will be represented there. Each column from the “formRanger List” sheet needs to be set to update the appropriate question on the form. For example, under “School:” in the sidebar, check the box next to “Populate from values list.” Then click the “Select” menu and choose “New Values List.” You need to point the add-on to the book review Google sheet and specify the “Building List” column of the “formRanger Lists” sheet.  Repeat this action for the “Genre” and “Who would you recommend this book to?” questions.

The "Who would you recommend this book to?" column is updated by student submissions. Submit the form yourself a few times to add a some choices in order to get the list started. Consider items such as "Kids who like funny books." or "Kids who like suspense."


formMule
Unlike formRanger, formMule is a spreadsheet add-on. Install formMule by clicking “Add-ons > Get Add-ons” from the Book Review Google Sheet and search for formMule.  Once installed, click “Add-ons > formMule > Set-up > Choose Source Data and Set Merge Type.” Set the “Moderation” sheet to contain your email addresses and merge source data. Then turn on the time-based trigger to fire every hour. Click next to build your email templates.


The current system has two emails. One is sent to the classroom teacher and the building point person when a student submits a review. Another is sent to the same stakeholders after a review has been moderated. Both of these templates are pre-set if you name the templates correctly. Template 1 should be named “Teacher Notification” and set to trigger when the Timestamp is “NOT NULL.” Template 2 should be named “Moderation Notification” and set to trigger when “Type 1 to Moderate…” equals “1.” You can see these templates and edit them when you click “Next: Edit Templates.” When the templates are edited to your satisfaction, click “Build / preview templates” and formMule is ready!


Using Awesome Table as an interface
The system is ready, all you need is an interface. The spreadsheet is pre-configured to work with the awesome table gadget from Romain Vialard. This gadget is easily embedded in any Google site, making the system highly extensible. The “Awesome Table” sheet must be published for the gadget to work. From the Google Sheet, click “File > Publish to the web” and select “Awesome Table” from the drop down menu. Then copy the link that appears. After you copy the published link, use this tutorial to help you install the Awesome Gadget into a Google Site. Romain Vialard has also composed a comprehensive guide.


Yup. That’s it.
Thanks for making it this far! I’m excited to see if this project gets traction with our students and teachers. Towards that effort, I am helping our fourth grade teachers install the system during their next grade-level meeting. Future plans include gamifying the review process and including a badge system. Please let me know if you use this project - especially if you think of a way to make it better!
Thursday, November 6, 2014

Redefining the Bird House


Recently I met with one of our second grade teachers, +Jennifer Cheung, to redesign a performance task for a unit on animal habitats. We were inspired by the birdhouse project mentioned in the SparkTruck movie and decided to expand it for her class (You can see our learning plan below.) It's been an interesting project so far. Next week we begin the "Prototype" phase and our student teams will build their proposed birdhouses out of cardboard. I can’t wait to see what what they come up with.

The addition of the second T-Wall in our Maker Space made it possible to have a full class ideating at the same time. Jen's class used the space several times to brainstorm their bird habitats and I couldn't be happier about how it worked. The T-Walls really contribute to collaborative brainstorming and make ideation sing. But the best part of the maker space is not the T-Wall; it’s the design thinking process developed by the Stanford d.school. The stuff in the space is useful, but it’s the process that’s changing pedagogy. 

Here's how we broke the process down:


Empathize (Done in the Classroom and at home)
“How do the birds in our area interact with their habitat?”
Observe the birds outside of the classroom and at home.  What types of birds do you see?  What are the birds doing?


Define (Done in the Classroom)
“What does a bird need to be comfortable in a habitat?”
What do the birds need to do what they are doing? Do these birds need special things?


Ideate (Done in the Maker Space)
“How might we build a comfortable habitat for these birds?”
Use “T-Walls” to brainstorm in teams.  Don’t yet explain the constraints of the project so as not to discourage “moonshot” thinking.  Have teams talk through their ideas. At the end, engage in “Considered Selection.” Each team member gets a graphic organizer with three columns: "Most Practical," "Most Exciting," and "Most Unusual." Team members write one choice for each category on the organizer. This becomes a way to vote as a team.


Prototype (Done in the Maker Space)
This is where the teams discover that there are constraints to the project.  Each team gets a square of cardboard (1.5 feet by 1.5 feet?), string, and duct tape to make the bird house. Teams will have safety cardboard cutters, hole punchers, and scissors. Teachers will help with a hot glue gun, and string. In fact - I’m thinking about getting Flex Seal to coat them. (As seen on TV!)


Test
The Birdhouses are hung on the tree and the class will observes how the birds interact with them during the year. If time allows, Perhaps students will redesign the houses after several months of observation for fidelity to the design thinking process.

Sunday, October 5, 2014

The D.School's T-Wall: Flexible Collaborative Spaces


Last summer I spent a lot of time trying to rethink our school’s Maker Space. One of my biggest influences was  “Make Space” by the Stanford d.school. “Make Space” showcases flexible design and creative environments that adapt to the needs of the people working in them. One project that resonated with me was the “T-Wall,” a freestanding structure with two intersecting 6’ X 4’ walls clad in dry-erase board and mounted on casters.

I had thought about getting whiteboard paint to surface the workbenches, or maybe the cabinet doors, but it’s expensive and seems difficult to apply. A T-Wall, on the other hand, can be moved around the room and acts as a great divider for group work. What’s better, the whiteboard material is just Gloss White Hardboard which is a great deal at 14 bucks a sheet. I used the d.school’s plans and after buying lumber, quality casters, and fasteners, the T Wall cost me just under $120. Not too bad for a piece of moveable classroom furniture with 5 large spaces for dry erase collaboration! Even so - I think I can make these cheaper with experience.


This has been a crazy September, but I’ve still used the T-Wall a few times. It was fantastic in a staff meeting where teachers could form groups based on learning style, discuss a problem, and write or draw freely within their nook.  It was just as good with students brainstorming ideas for the Maker Space. The kids naturally engaged in conversations about their ideas when confronted with the common surface of the “wall.” Then, they took a museum walk to read each other’s ideas.

It was successful enough to make a second T-Wall. This time I am going to deviate from the d.school’s specifications. The original plan calls for two 6’ by 4’ walls. Unfortunately, this makes it difficult to move through a standard doorway. I had to assemble it inside the room. Also, the T-Wall stands at an imposing 6ft 4in after adding casters. This is tall enough to collide with the SMART Board arm at the end of the classroom - an accident waiting to happen. The next build will be a called the “Little T”, one that’s a foot shorter and six inches narrower.