Sunday, October 5, 2014

The D.School's T-Wall: Flexible Collaborative Spaces


Last summer I spent a lot of time trying to rethink our school’s Maker Space. One of my biggest influences was  “Make Space” by the Stanford d.school. “Make Space” showcases flexible design and creative environments that adapt to the needs of the people working in them. One project that resonated with me was the “T-Wall,” a freestanding structure with two intersecting 6’ X 4’ walls clad in dry-erase board and mounted on casters.

I had thought about getting whiteboard paint to surface the workbenches, or maybe the cabinet doors, but it’s expensive and seems difficult to apply. A T-Wall, on the other hand, can be moved around the room and acts as a great divider for group work. What’s better, the whiteboard material is just Gloss White Hardboard which is a great deal at 14 bucks a sheet. I used the d.school’s plans and after buying lumber, quality casters, and fasteners, the T Wall cost me just under $120. Not too bad for a piece of moveable classroom furniture with 5 large spaces for dry erase collaboration! Even so - I think I can make these cheaper with experience.


This has been a crazy September, but I’ve still used the T-Wall a few times. It was fantastic in a staff meeting where teachers could form groups based on learning style, discuss a problem, and write or draw freely within their nook.  It was just as good with students brainstorming ideas for the Maker Space. The kids naturally engaged in conversations about their ideas when confronted with the common surface of the “wall.” Then, they took a museum walk to read each other’s ideas.

It was successful enough to make a second T-Wall. This time I am going to deviate from the d.school’s specifications. The original plan calls for two 6’ by 4’ walls. Unfortunately, this makes it difficult to move through a standard doorway. I had to assemble it inside the room. Also, the T-Wall stands at an imposing 6ft 4in after adding casters. This is tall enough to collide with the SMART Board arm at the end of the classroom - an accident waiting to happen. The next build will be a called the “Little T”, one that’s a foot shorter and six inches narrower.

Saturday, October 4, 2014

Student Timelines from a Google Form using sheetSpider

An update for this project has been posted here.

The goal of this project is to give students a personal timeline of the wonderings and observations that they make using a Google Form. Then, this slick timeline can be embedded in a student portfolio. This project can be integrated into the moderated Twitter exit ticket that I blogged about a few weeks ago, or it can stand alone.


Here is what you need:
  • A simple Google Form linked to an “old” spreadsheet that required students to sign into your domain.
  • The SheetSpider Script from New Visions for Public Schools (thus the “old” spreadsheet)
  • An affinity for nice looking timelines


I can’t wait to implement this in my school, and hopefully build it into some student portfolios. One word of caution: this system needs the student satellite sheet to be published to the web in order for it to be read by the Timeline application. The next section explains how to do this yourself, step by step. There currently isn’t a moderation component although one could be built in, similar to the one used for the Twitter system.

So How Does This Work?
SheetSpider is a nifty script that lets you distribute values to multiple sheets based on a criteria - in this case the criteria is the student Google ID.  Based on this ID, sheetSpider will send each student’s exit ticket responses to a unique Sheet for that student. SheetSpider can be set to use a template when making the satellite sheets and we will use the template file from Timeline JS. If you haven’t seen this Timeline creator, you should.  It does a beautiful job.


Make a copy of the Timeline template and then use the “copy to” feature to add the sheet to your “Exit Ticket” sheet file. The timeline sheet has more columns than we need for our simple exit ticket form, but we need the whole template when we copy the student submissions to the satellite sheets. Specifically, we want to send the form response timestamp to the “Start Date” column, the exit tweet column to the “Headline” column, and the username column to "Media Credit." A simple function like the one below can move the data from tab to tab, you'll see it at the top of the previously mentioned columns in the demo sheet.


= ARRAYFORMULA ( If ( 'Form Responses 1'!C2:C = "", "", 'Form Responses 1'!C2:C ) )


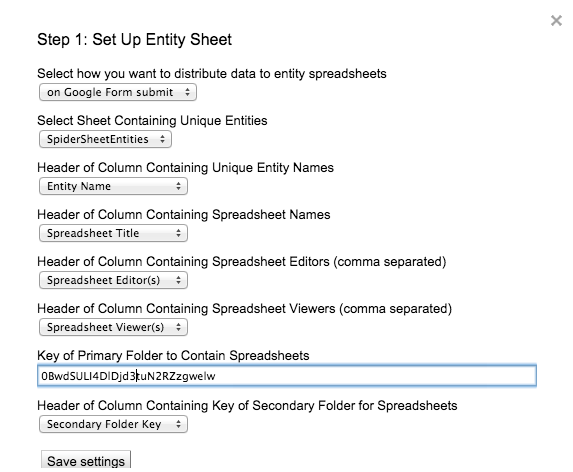
Now it’s time to install the sheetSpider script. Keep in mind that as of this writing, sheetSpider is only available with an  "old" Google Sheet. You must click "tools" > "script gallery" and search for "sheetSpider." A tab named “SpiderSheetEntities” will be created when you install and initialize the script.  Then, click the sheetSpider menu item and proceed to “Step 1: Set Up Entity Sheet.” 


We have to set the script to run on “Manual Push” because we are using the copied timeline sheet to trigger sheetSpider instead of the form responses sheet. All of the items in Step 1 can match to the columns in the “SpiderSheetEntities” tab that was already created. You might want to create a folder for your satellite timeline sheets and paste the folder ID into the “Key of Primary Folder…” field.


Now proceed to “Step 2: Provision/Update…” In the first field, paste the document Key of the Timeline JS template. The feeder sheet needs to be set to “od1” which is the tab that we copied over from the template. The unique entity name can be set to “Media Credit” which is where we fed in the student usernames. At this point, click the “Save and Provision…” button.


“Step 3: Disagregate and Push Data” is the last sheetSpider step we need. Make sure your settings are “Manual Push” and “Append only new unique records.” The uniqueness criterion can be both “Start Date” and “Media Credit” to ensure uniqueness. Running Step 3 will create the satellite sheets. You will need to publish those sheets for the timelines to work.


Now lets connect the timelines.  Open the “SpiderSheetEntities” tab and insert two columns to the right of Column F. Name these “Timeline Embed” and “Timeline Link.”  Then, add one column to the right of “J” and name it “Spreadsheet Key.”


Paste the following function into K2:


=ARRAYFORMULA(right (I2:I,23))


Paste the following function in G2:


= ARRAYFORMULA ( IF (A2:A = "", "" , "<iframe src='http://cdn.knightlab.com/libs/timeline/latest/embed/index.html?source=" & K2:K & "#gid&font=Bevan-PotanoSans&maptype=toner&lang=en&height=350' width='100%' height='350' frameborder='0'></iframe>"))


Then, paste the following function in H2:


= ARRAYFORMULA ( IF (A2:A = "", "" , "http://cdn.knightlab.com/libs/timeline/latest/embed/index.html?source=" & J2:J & "&font=Bevan-PotanoSans&maptype=toner&lang=en&height=650"))

These last functions complete the project.  Student submitted exit tickets are aggregated to personal spreadsheets, and once the spreadsheets are published, they are used to create embeddable timelines. The embed code works great but not in a Google Site. Use the "Timeline Link" and the iframe gadget if you are using a Google Site. Let me know if you use the project or make it better!